
>>

A crowd-pleasing, make-ahead layered dip with creamy refried beans, guacamole, seasoned sour cream, salsa, cheese, lettuce, olives, tomatoes, and green onions — perfect for parties and game day.
This seven-layer dip has been my go-to appetizer for every gathering since I first assembled it at a summer potluck years ago. I discovered this combination when I wanted a no-fuss, crowd-pleasing dish that traveled well and could be assembled in under 30 minutes. The contrast of cool, creamy guacamole and sour cream with warm, hearty refried beans and tangy salsa is what keeps everyone coming back for more. The texture play — the smoothness of the beans, the silky layer of seasoned sour cream, the chunky salsa, and the crisp lettuce and tomatoes — is what makes it memorable.
I love this version because it uses reliable store-bought staples when time is short, and a few simple tips make it taste like it took hours. The balance of flavors is tuned to please most palates: mild, layered, and texturally interesting. I usually prepare it the morning of an event, chill it for an hour, then bring it to room temperature just before serving so the flavors bloom. Leftovers rarely last long in my house — guests always ask for the recipe.
Personally, my family went from skeptical to obsessed the first time I brought this to a backyard barbecue. My sister told me she could eat the entire pan herself, and my nephews always head straight for the tomato-and-olive edge because they love the contrast. Over time I learned a few tricks — like draining the salsa and smoothing the bean layer thinly — that transformed this from messy to elegant on a disposable chip-and-dip table.
My favorite part of this combination is how reliably it disappears — it’s the appetizer I bring when I want a no-fail option. When I hosted an impromptu football night, neighbors raved that the sour cream tasted like it had been made from scratch, and the drained salsa trick kept the plate edges clean and chip-friendly. Little adjustments from each gathering taught me to always pat tomatoes and strain salsa first.
Store covered in the refrigerator for up to 48 hours. For best texture, use an airtight container or cover the 9x13 pan tightly with plastic wrap. If you plan to store longer, remove the lettuce and fresh tomato layer before refrigerating; they can be added fresh when serving to restore crispness. Reheat is unnecessary — bring to room temperature for 15–20 minutes before serving for the creamiest mouthfeel. Avoid freezing assembled dip: water in the vegetables separates and ruins the texture.
To make a dairy-free version, substitute sour cream with a thick coconut or cashew-based sour cream alternative and use dairy-free shredded cheese. Swap premade guacamole for mashed avocado with lime and salt for a fresher bite. Use black bean mash if you prefer a heartier bean texture. For a lower-fat option, choose light sour cream and reduced-fat cheese; the dip will be a touch tangier and less rich but still very satisfying.
Serve with sturdy tortilla chips, warm pita wedges, or vegetable crudités like sliced bell peppers and cucumber. Garnish with extra cilantro, a drizzle of hot sauce, or a squeeze of fresh lime for brightness. This pan works well as a centerpiece at buffets — place small plates and chips nearby so guests can scoop neatly. For a Tex-Mex spread, pair with smoky grilled corn, shredded chicken tacos, and a crisp margarita.
This layered appetizer traces its roots to Southwestern and Tex-Mex party cuisine where communal, shareable dishes are prized. The concept of stacking familiar Mexican-inspired components — beans, guacamole, sour cream, salsa, and cheese — into a single dish gained popularity in mid-20th-century America as convenience foods and canned ingredients became common. Regional variations emphasize spicier salsas or add chiles, while some versions include ground beef or refried bean mixtures seasoned with cumin and chili powder.
In summer, swap store-bought salsa for a fresh pico de gallo made with ripe garden tomatoes and add grilled corn kernels for sweetness. In winter, use jarred fire-roasted salsa and top with pickled jalapeños for warmth. Holiday gatherings benefit from a chopped romaine sub to keep color bright, and you can add a drizzle of cilantro-lime crema for a festive finish.
Assemble most layers a day ahead, but add lettuce, tomatoes, and green onions the day you serve for peak freshness. Use a slotted spoon and a mesh strainer to drain salsa and olives well. Keep chips airtight to preserve crunch: store them in a resealable bag or a chip container, and place the dip out only when guests begin to graze to avoid chips going soft.
Finally, this dish rewards slight personalization — experiment with textures and doneness levels (for example, a little roasted corn for smokiness). I hope you enjoy sharing it as much as I do; it's consistently the first pan emptied at any party.
Drain salsa and olives thoroughly to prevent a watery top layer and limp lettuce.
Thin refried beans with a few tablespoons of water for a smooth, spreadable base.
Chill the assembled dish for at least 1 hour to let flavors meld and to firm the layers before serving.
Pat tomatoes dry on paper towels if they’re very juicy to maintain crisp texture.
This nourishing the best 7-layer dip {easy recipe} recipe is sure to be a staple in your kitchen. Enjoy every moist, high protein slice — it is perfect for breakfast or as a wholesome snack any time.
Yes, you can assemble up to 24 hours ahead. For best texture, add lettuce and tomatoes just before serving.
Drain the salsa through a fine mesh strainer for a few minutes to remove excess liquid and prevent a watery top layer.
This The Best 7-Layer Dip {Easy Recipe} recipe makes perfectly juicy, tender, and flavorful steak every time! Serve with potatoes and a side salad for an unforgettable dinner in under 30 minutes.
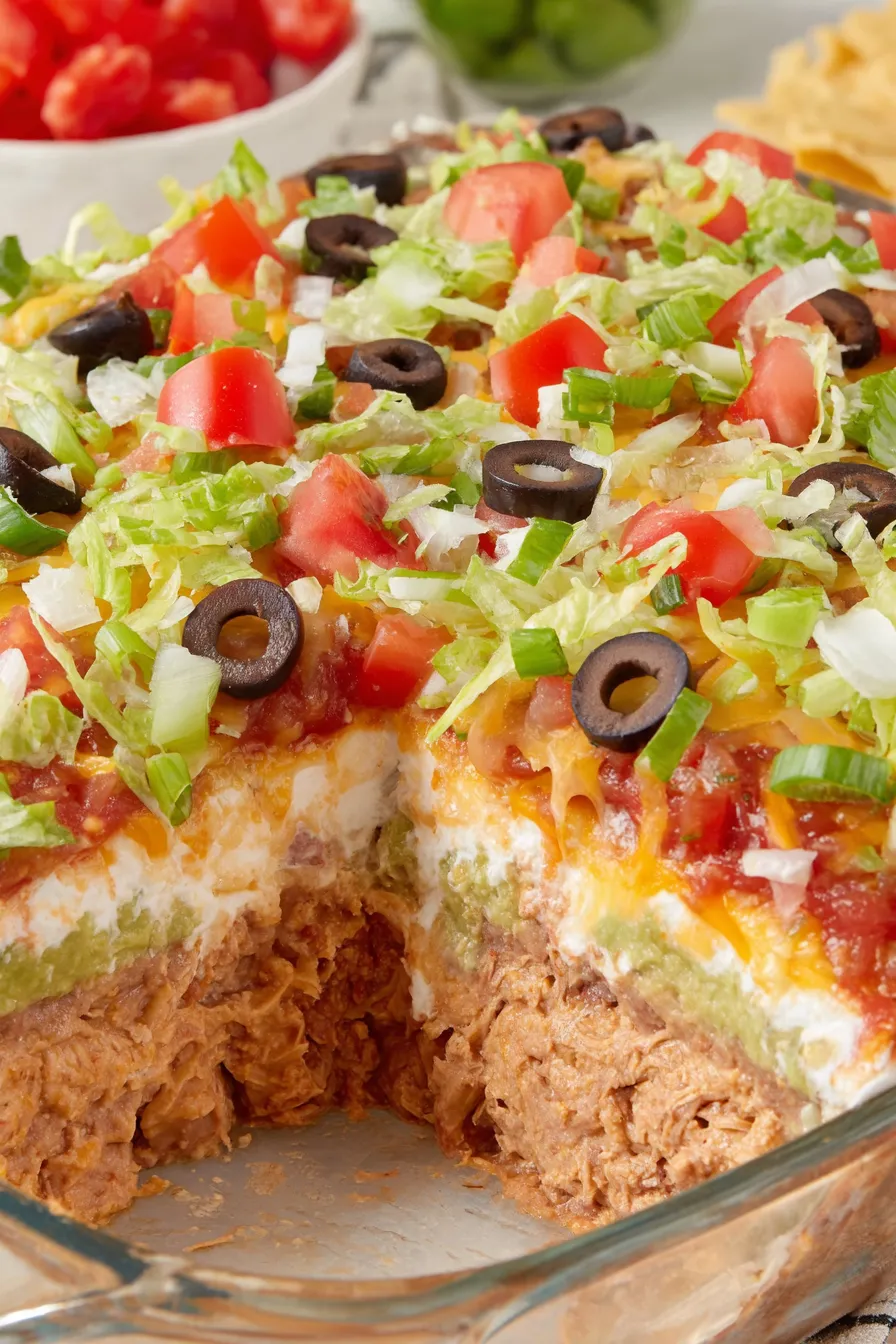
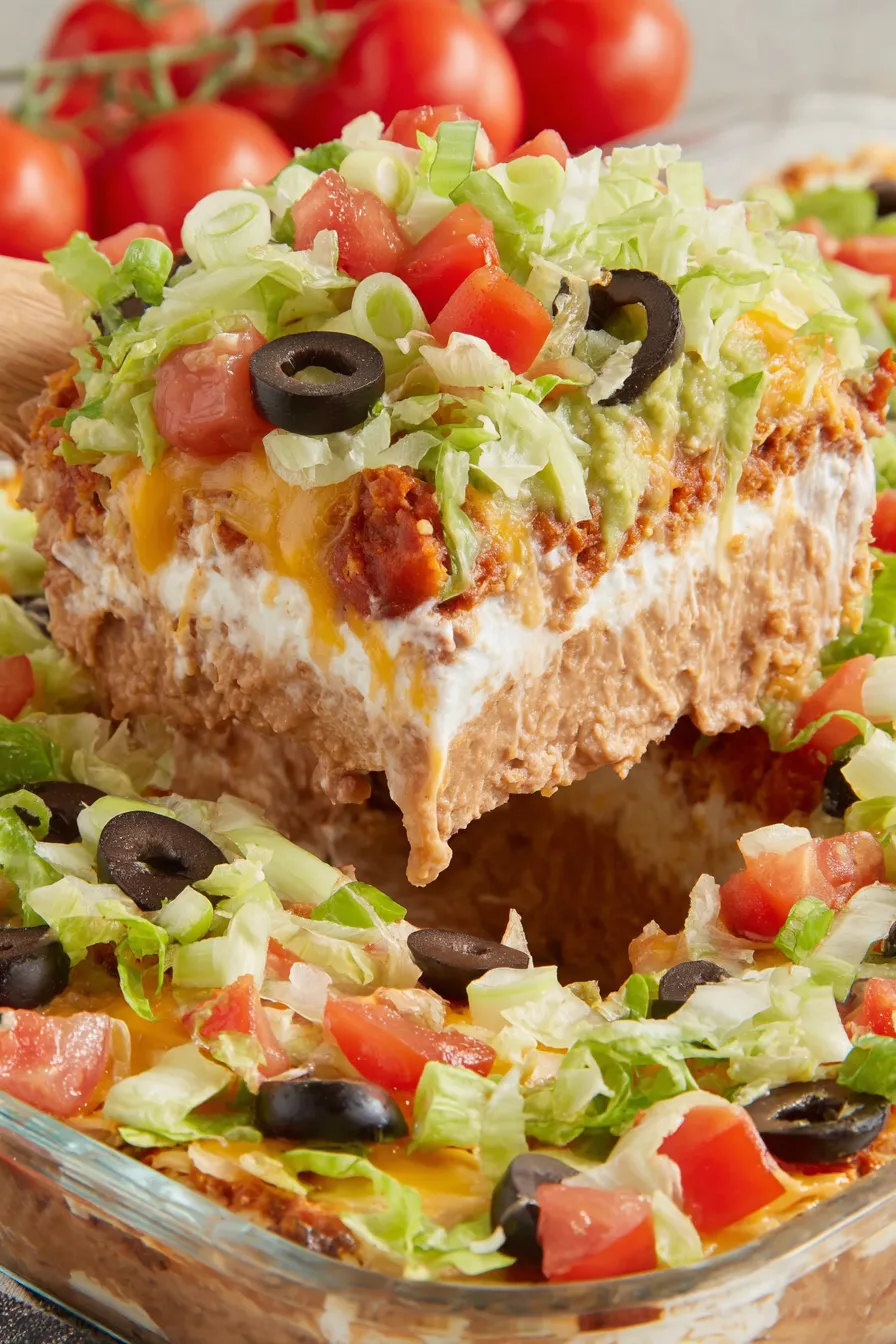
Combine the refried beans with 3 tablespoons of water in a small bowl. Stir until completely smooth and spreadable, adding an extra teaspoon of water if needed for a satin texture.
Use a silicone or offset spatula to spread the bean mixture evenly across the bottom of a 9x13 glass dish into a uniform 1/4-inch layer.
Evenly spread 1½ cups of premade guacamole over the beans, smoothing gently without mixing layers.
Whisk 2 cups sour cream with the 1-ounce taco seasoning packet until smooth, then spread over the guacamole as the next layer.
Drain 16 ounces of chunky salsa in a mesh strainer to remove excess liquid, then spread a thin layer over the sour cream.
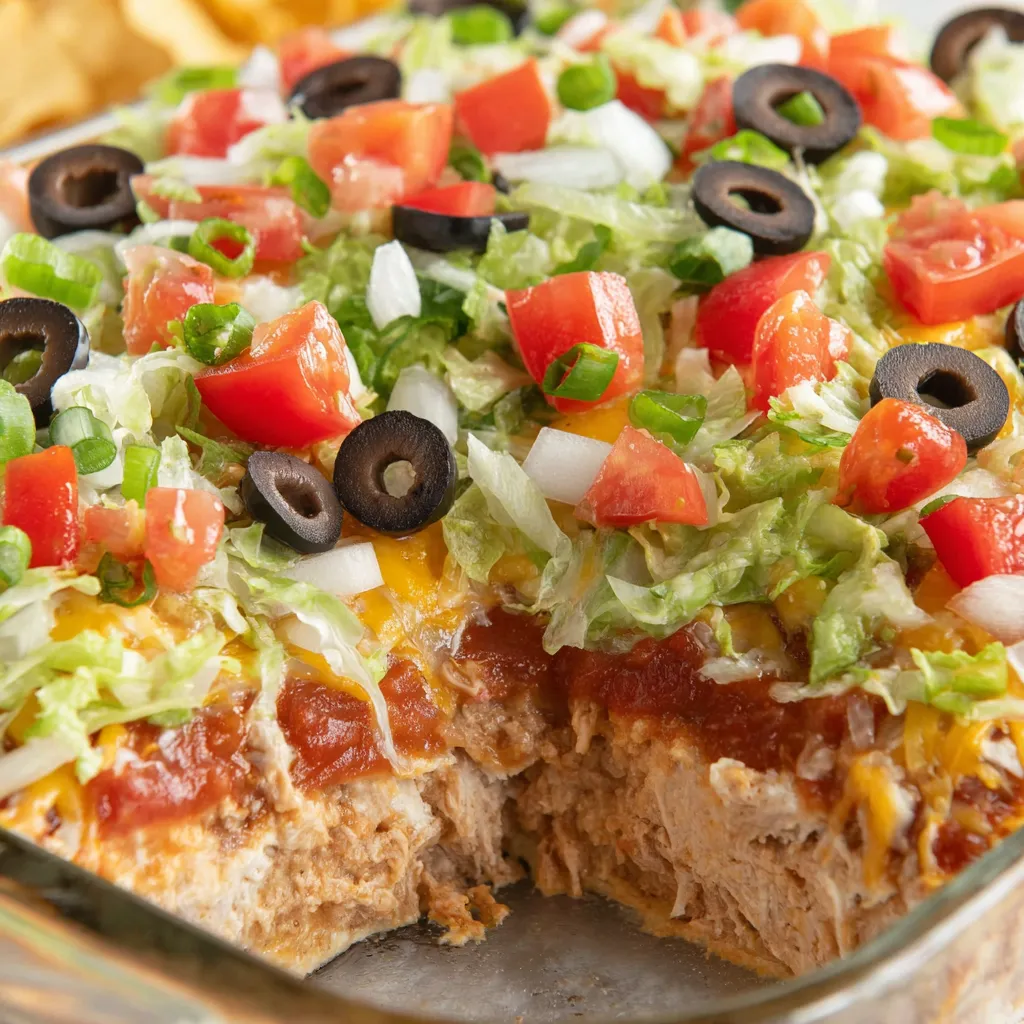
Sprinkle 2 cups shredded cheese, followed by 2 cups shredded lettuce and the drained sliced black olives.
Scatter 1 cup chopped roma tomatoes (patted dry) and ½ cup thinly sliced green onions. Cover tightly and chill at least 1 hour before serving.
Last Step: Please leave a rating and comment letting us know how you liked this recipe! This helps our business to thrive and continue providing free, high-quality recipes for you.
Leave a comment & rating below or tag
@whiskia on social media!

Tender, herb-laced meatballs baked to juicy perfection with Parmesan and garlic. Perfect over spaghetti, tucked into subs, or served with favorite dips.

Creamy, silky carbonara with smoky bacon, peppery bite, and perfectly coated spaghetti. Ready in 25 minutes for a comforting, crowd-pleasing dinner.

A rich, silky garlic pasta made in one pan with milk and Parmesan for a fast, comforting dinner that is ready in about 20 minutes.
Leave a comment & rating below or tag @whiskia on social media!
Enjoyed this recipe? Share it with friends and family, and don't forget to leave a review!
This recipe looks amazing! Can't wait to try it.
Comments are stored locally in your browser. Server comments are displayed alongside your local comments.

Join to receive our email series which contains a round-up of some of our quick and easy family favorite recipes.
