
>>

A fudgy and glossy brownie baked in a ready made pie shell for an easy indulgent dessert. Rich chocolate flavor with a crackly top and optional nuts for crunch.
This brownie pie has been a fast favorite in my kitchen since the day I first melted butter and sugar together and watched that glossy, slightly crackled surface form in the oven. I discovered this method one afternoon when I needed an approachable dessert for a potluck and only had a frozen pie shell and a few pantry staples. The result was a dense, fudgy interior with a shiny top and a buttery crust that made everyone ask for the recipe. It is comfort in a slice and easier than making a full tray of brownies.
I make this pie when I want something that feels special but is actually very simple. The texture ranges from molten and fudgy to more set and sliceable depending on how long you bake it. Warm from the oven it is almost like a lava brownie in a shell. Chilled it sets up like a rich chocolate tart. Family members and guests often reach for a second piece and call it the best chocolate pie they have tasted. That kind of reaction made it a repeat offering at weeknight dinners and holiday dessert tables.
In my experience this dish always brings people together. I remember a simple Sunday when I served it with a scoop of vanilla ice cream and the kitchen fell silent while everyone ate. That silence is the highest compliment for a dessert. Over time I adjusted baking times and the mix in nuts to match family preferences. The ease and consistent success are why I keep this pie in my dessert rotation.
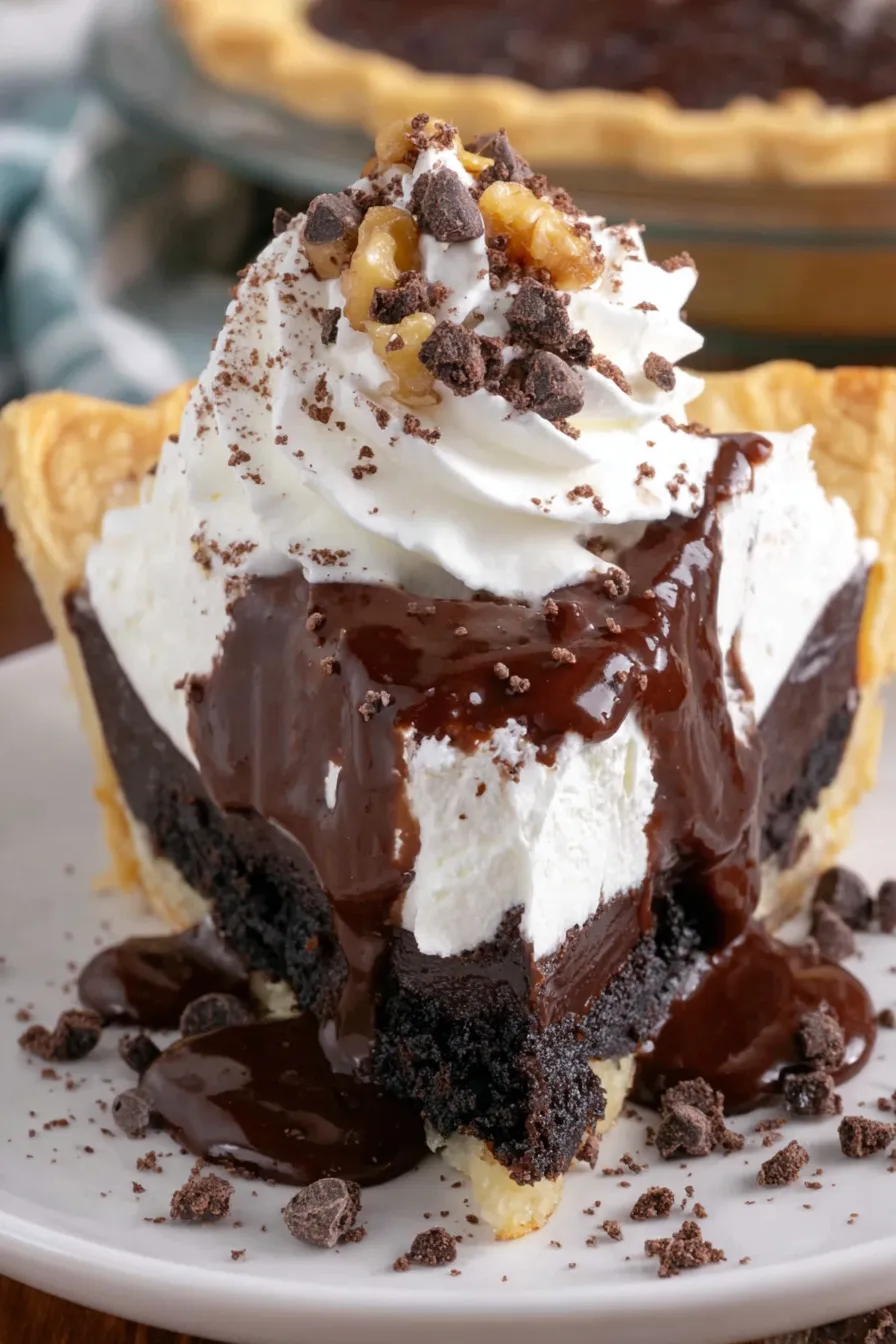
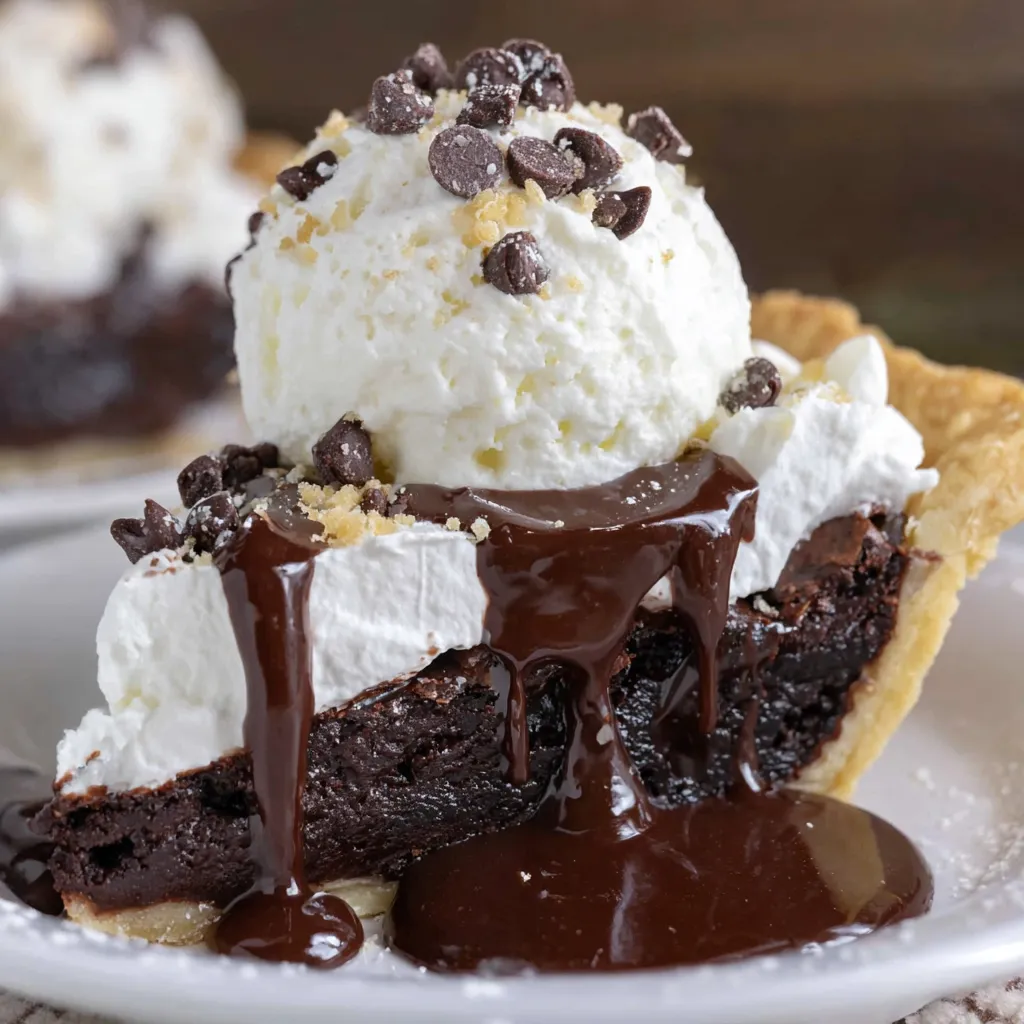
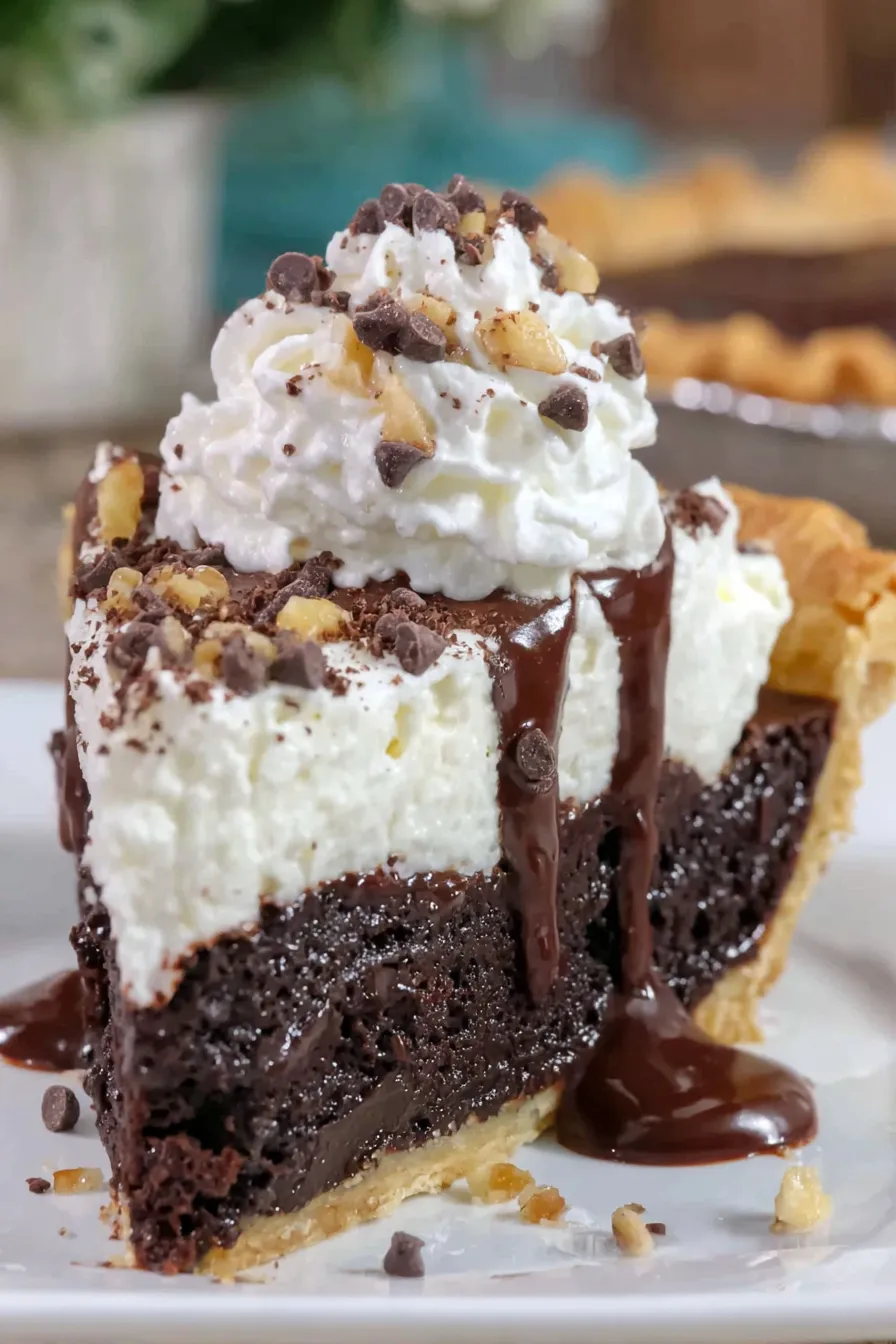
My favorite detail of this pie is how the top shatters into shiny cracks when you slice it. That texture combined with a buttery crust makes simple scoops of vanilla ice cream taste luxurious. I often make a double batch of filling and keep one in the freezer for an emergency dessert night. Friends have told me they prefer this in a pie shell to classic sheet pan brownies because the crust adds another layer of flavor and structure.
Store cooled slices in an airtight container in the refrigerator for up to four days. To freeze whole, wrap the pie tightly in plastic wrap and then in foil to prevent freezer burn. Thaw overnight in the refrigerator before serving and allow to come to room temperature for an hour for the best texture. Reheat single slices in a microwave for fifteen to twenty seconds or warm in a low oven at 300 degrees Fahrenheit for ten minutes. Use glass or metal containers for longer storage if you want a more rigid support.
If you do not have a frozen pie shell you can make a quick crust from crushed cookies and melted butter. Swap melted butter for browned butter for a nutty depth. Replace walnuts with pecans or omit nuts entirely for nut free servings. Use milk chocolate chips for a sweeter result or dark chips for more intensity. For a gluten free option use a store bought gluten free pie shell and substitute all purpose flour with a one to one gluten free blend.
Serve slices with a drizzle of chocolate sauce and a generous scoop of vanilla ice cream for contrast. A dusting of powdered sugar and a few fresh raspberries add color and bright acidity. For parties cut into small wedges and place on a platter with spoons for a more casual dessert course. Pair with bold coffee or a dessert wine for an elevated finish. Garnish with chopped toasted walnuts for crunch and texture contrast.
In winter add a teaspoon of ground cinnamon and a pinch of cayenne for a warm spice profile. In summer top slices with macerated berries or a citrus scented whipped cream. For the holidays stir in a quarter cup of crushed peppermint or swap half the chips for white chocolate for a festive twist. Adjust toppings and garnishes to match seasonal produce for complementary flavor pairings.
Prepare the filling up to a day ahead and keep it covered in the refrigerator. Pour into the frozen shell and bake when ready. Alternatively bake the pie fully and freeze individual slices for grab and go desserts. Label containers with the date and reheating instructions. For potluck transport place the pie in a low sided box and keep an ice pack beneath if you plan to serve with ice cream.
Readers have told me they served this pie at birthday dinners and family reunions with rave reviews. One friend swapped the nuts for toasted coconut and reported that it vanished in under ten minutes. Another reader said chilling the pie overnight improved sliceability for a buffet. These variations and the consistent applause make this a dessert I reach for when I want reliable results and happy faces.
Enjoy this chocolate pie warm or chilled. I hope it becomes a go to for your gatherings and quiet nights alike. There is pleasure in simple ingredients done well and in the way a familiar recipe can make new memories.
Let the melted butter and sugar sit five minutes before whisking to help dissolve the sugar and create a glossy top.
Remove the pie closer to twenty minutes after foil removal for fudgy texture and toward thirty minutes for a firmer slice.
Toast nuts briefly to bring out oils and flavor then cool before chopping and adding to the batter.
Use a quality vanilla extract and sift cocoa if it is lumpy to avoid streaks in the batter.
This nourishing brownie pie recipe is sure to be a staple in your kitchen. Enjoy every moist, high protein slice — it is perfect for breakfast or as a wholesome snack any time.
Bake uncovered for twenty to thirty minutes after removing the foil. Remove closer to twenty minutes for a fudgier center.
Wrap tightly and freeze for up to three months. Thaw overnight in the refrigerator before serving.
This Brownie Pie recipe makes perfectly juicy, tender, and flavorful steak every time! Serve with potatoes and a side salad for an unforgettable dinner in under 30 minutes.
Place a rack in the lower third of the oven and preheat to 350 degrees Fahrenheit. Keep the frozen pie crust frozen until ready to pour the batter.
Put the granulated sugar in a large bowl and pour in the hot melted butter. Stir briefly then let sit undisturbed for five minutes. Whisk vigorously for thirty seconds after the rest to help create a glossy top.
Whisk in the whole egg the extra egg yolk one tablespoon water and vanilla extract until smooth. Tap the whisk to remove excess batter before adding dry ingredients.
Sprinkle the cocoa the powdered sugar the flour and the salt over the butter mixture. Stir with a rubber spatula until the batter is glossy and uniform. Avoid over mixing.
Fold in the semisweet chocolate chips and finely chopped walnuts if using. This creates pockets of melted chocolate and crunch.
Pour the batter into the frozen pie shell and smooth the top. Lightly mist foil with nonstick spray and tent over the pie without pressing onto the filling.
Bake in the lower third of the oven covered with foil for twenty five minutes to protect the crust while the interior sets.
Remove the foil and bake uncovered for twenty to thirty more minutes based on desired texture. Cool on a wire rack and serve warm or at room temperature.
Last Step: Please leave a rating and comment letting us know how you liked this recipe! This helps our business to thrive and continue providing free, high-quality recipes for you.
Leave a comment & rating below or tag
@whiskia on social media!

Tender, herb-laced meatballs baked to juicy perfection with Parmesan and garlic. Perfect over spaghetti, tucked into subs, or served with favorite dips.

Creamy, silky carbonara with smoky bacon, peppery bite, and perfectly coated spaghetti. Ready in 25 minutes for a comforting, crowd-pleasing dinner.

A rich, silky garlic pasta made in one pan with milk and Parmesan for a fast, comforting dinner that is ready in about 20 minutes.
Leave a comment & rating below or tag @whiskia on social media!
Enjoyed this recipe? Share it with friends and family, and don't forget to leave a review!
This recipe looks amazing! Can't wait to try it.
Comments are stored locally in your browser. Server comments are displayed alongside your local comments.

Join to receive our email series which contains a round-up of some of our quick and easy family favorite recipes.
