
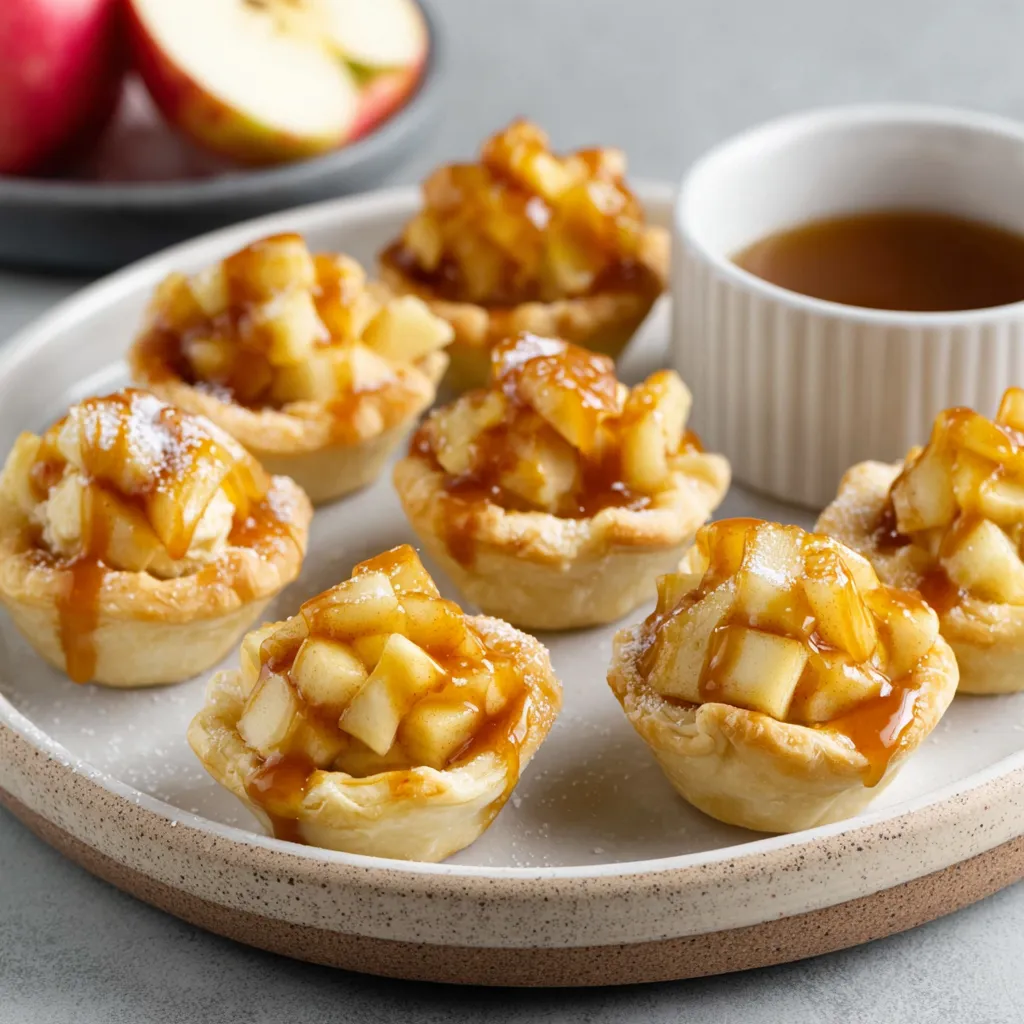
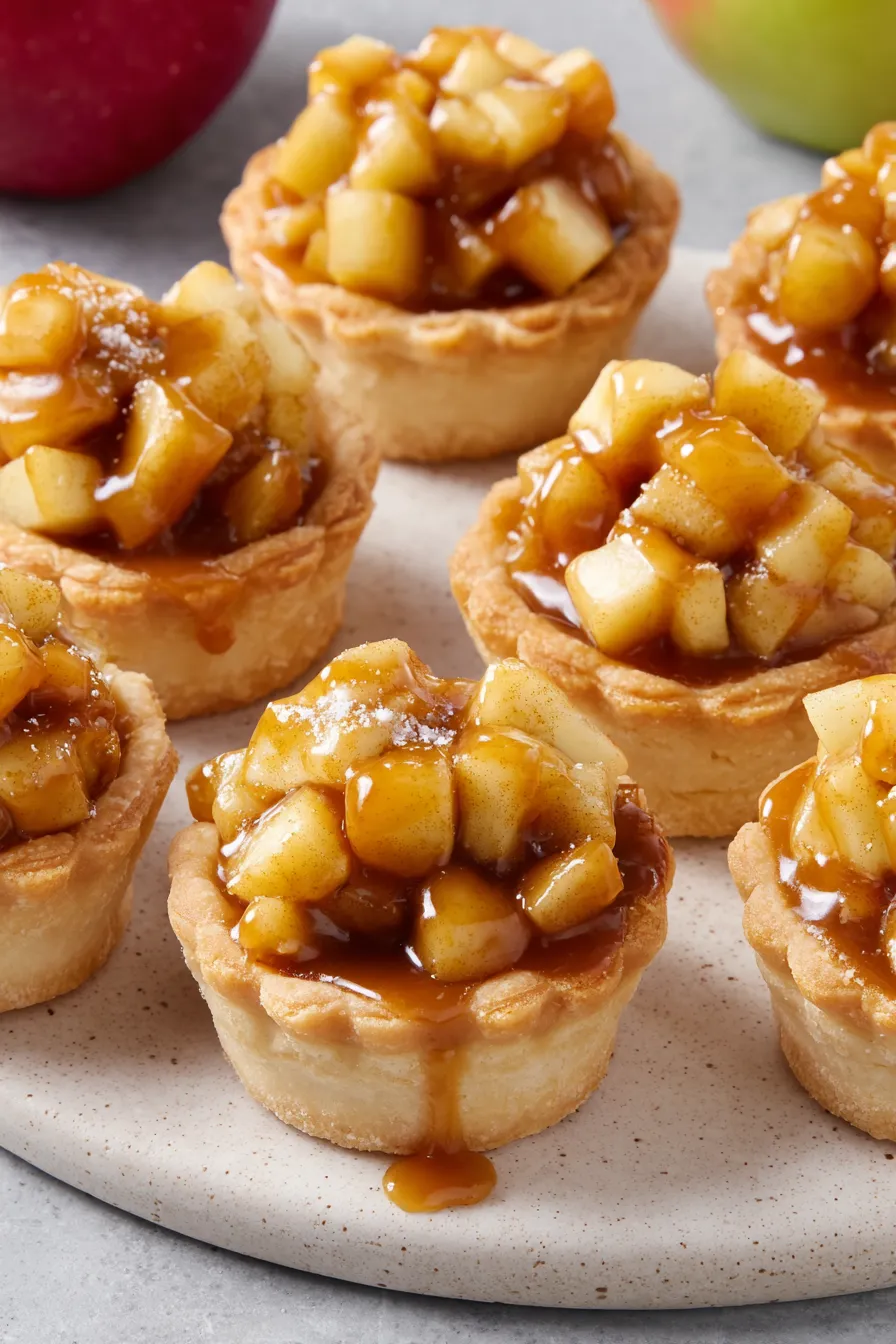
Caramel Apple Tartlets

Buttery miniature pastry cups filled with tender cinnamon apples and a glossy caramel sauce — easy to make and perfect for parties or cozy afternoons.
Why You'll Love This Recipe
- Ready in under an hour from start to finish, this is a perfect last-minute treat for unexpected guests or a relaxed afternoon tea.
- Uses one sheet of refrigerated pie crust and pantry staples including sugar, flour, and bottled caramel topping so there is minimal prep and no blind-baking stress.
- Small portions mean easy sharing, less waste, and beautiful presentation on a platter for parties, potlucks, or holiday gatherings.
- Adaptable to different apples or alternate toppings — swap in tart green apples for extra tang or drizzle with warmed salted caramel for fussier palates.
- Simple stovetop filling is forgiving; cook the apples until crisp-tender and the sauce will thicken nicely with just a few minutes of boiling.
- The finished cups freeze well for up to three months if wrapped individually, convenient for making ahead.
In my experience these tartlets have been a crowd-pleaser: neighbors, children, and even dessert skeptics reach for seconds. I often double the filling when I know company is coming because the first platter never lasts long. They are also a great way to use up slightly past-prime apples that still have good texture.
Ingredients
- Refrigerated pie crust: One sheet works best for convenience. Choose a butter-based crust for richer flavor; I like Pillsbury refrigerated pie crust for its consistent texture. Let it warm slightly so it rolls without cracking.
- Apples: Use about 2 cups of diced, peeled tart apples, such as Granny Smith or Cortland, for a pleasant balance of acidity and firmness. Apples that hold shape are important so the filling does not turn to mush.
- Caramel topping: Three tablespoons of fat-free caramel ice cream topping gives a glossy caramel flavor without making the filling too heavy. You can use full-fat or salted caramel for a richer profile.
- Sugar and cinnamon: A combination of granulated sugar and ground cinnamon is used twice: lightly sprinkled in the shells before baking and folded into the cooked filling. This layers flavor and creates a warm aroma.
- Butter and flour: Two teaspoons of butter for sautéing the apples and two tablespoons of all-purpose flour to thicken the sauce. The flour cooks briefly to remove raw taste and yields a silky, clingy sauce.
- Acid and seasoning: Half a teaspoon of lemon juice brightens the filling and one-eighth teaspoon of salt balances the sweetness.
Instructions
Prepare the crust: Preheat the oven to 350 degrees F. On a lightly floured surface roll the refrigerated dough just enough to smooth seams—about 1 to 2 inches larger than the sheet. Use a 2 1/2-inch round cutter to cut twenty circles. Press each circle into lightly greased miniature muffin cups so the dough lines the bottom and sides evenly. Prick the bottoms with a fork to prevent large air pockets. Lightly spray the exposed tops with cooking spray and sprinkle a mixture of 1 tablespoon sugar and a dash of ground cinnamon evenly over all shells to create a crisp sugared edge. Blind-bake the shells: Bake the tart shells until golden brown at the edges and set in the centers, typically 6 to 8 minutes. Watch closely after 6 minutes because miniature shells can overbrown quickly. Remove from oven and allow to cool for 5 minutes in the pan before carefully lifting the tartlets onto a wire rack to finish cooling. This short bake firms the crust so it holds the filling without sogginess. Make the filling: In a medium saucepan melt 2 teaspoons butter over medium heat. Add 2 cups diced peeled tart apples and sauté, stirring frequently, until the pieces are crisp-tender, about 4 to 5 minutes. Stir in 3 tablespoons sugar, 3 tablespoons caramel topping, 2 tablespoons all-purpose flour, 1/2 teaspoon ground cinnamon, 1/2 teaspoon lemon juice and 1/8 teaspoon salt. Bring the mixture to a gentle boil, whisking or stirring constantly so the flour dissolves and the sauce thickens. Continue cooking until apples are tender but still hold their shape, approximately 2 minutes more. Remove from heat and cool for about 5 minutes so the sauce sets slightly and is easier to spoon. Assemble: Spoon the cooled apple-caramel filling into each cooled tart shell, filling to just below the rim so the filling does not overflow if reheated. Arrange tartlets on a serving plate. Serve warm or at room temperature. If you prefer a glossy finish, warm a tablespoon more of caramel topping and drizzle lightly over each tartlet just before serving.
You Must Know
- The finished tartlets freeze well for up to three months if wrapped individually and stored in an airtight container; thaw overnight in the refrigerator and warm briefly in a 300 degrees F oven.
- These are high in natural fruit sugars and added caramel so enjoy in moderation; each tartlet is a small portion that helps with managing indulgence.
- Use apples that hold shape; softer eating apples will break down and make the filling runny even with the flour thickener.
- If you need a gluten-free version, use a gluten-free refrigerated pastry and a gluten-free flour blend to thicken the filling.
My favorite thing about these tartlets is how quickly they elevate ordinary ingredients into something special. Friends often tell me the first bite brings back memories of bakery windows and autumn fairs. They are forgiving to make, and the little imperfection of each pastry rim is part of their charm. I love serving them right after baking so the crust is warm and the caramel still gleams.
Storage Tips
Store leftover tartlets in a single layer in an airtight container at room temperature for up to 24 hours for the best crust texture. For longer storage, refrigerate for up to 3 days; note that the crust will soften slightly in the fridge. To freeze, place tartlets on a tray until firm, then transfer to a freezer-safe container with layers separated by parchment. Reheat from frozen in a 325 degrees F oven for 8 to 12 minutes until warmed through. If reheating from refrigerated, a 5-minute warm-up at 300 degrees F restores some crispness. Avoid microwaving as it will make the pastry soggy.
Ingredient Substitutions
Swap the refrigerated pie crust for homemade butter pastry if you have time, rolling it to a similar thickness. Use full-fat caramel sauce or dulce de leche for a richer result, reducing the added sugar by one teaspoon. Replace all-purpose flour with a gluten-free blend 1:1 to accommodate allergies. For a dairy-free version, use plant-based butter and a dairy-free caramel topping, but expect a slightly different mouthfeel. If apples are not available, pears provide a lovely autumnal alternative though they soften more quickly so reduce stove time by a minute or two.
Serving Suggestions
Present tartlets on a tiered platter for parties or box them individually in small pastry boxes for guests to take home. They pair beautifully with lightly whipped cream, a small scoop of vanilla bean ice cream, or a drizzle of warm salted caramel. For a brunch option, serve alongside spiced coffee or a cider cocktail. Garnish with a tiny mint leaf or a light dusting of powdered sugar for contrast. These mini tarts also make charming additions to dessert boards alongside nuts and cheese.
Cultural Background
Miniature fruit tarts are a classic pastry tradition that reflect European pastry techniques adapted for home kitchens. Tartlets like these often appear in American fall baking, where orchard fruit and convenience ingredients are combined to create approachable treats. The use of refrigerated dough is a mid-20th century convenience innovation that popularized small tart shells in home baking. Carameled apple fillings echo classic apple pie flavors but offer a faster, single-bite alternative that nods to both rustic country kitchens and modern entertaining.
Seasonal Adaptations
In fall, boost spice by adding 1/8 teaspoon ground nutmeg and a pinch of cloves to the filling. Winter celebrations call for a splash of brandy or spiced rum folded into the warm filling after removing from heat. In spring and summer, swap apples for firm stone fruit such as peeled and diced peaches, reduce lemon juice slightly and add a teaspoon of vanilla extract for brightness. For holiday gatherings, top each tartlet with a toasted pecan half and a sprinkle of flaky sea salt to create a salted caramel effect.
Meal Prep Tips
Prepare the filling ahead and store it in the refrigerator for up to 48 hours; rewarm gently before filling shells. Blind-bake several sheets of shells and freeze them separately; when ready to serve, assemble with room temperature filling and warm briefly. For larger gatherings, scale the filling by doubling the apples and caramel, and bake shells in batches. Use portioned piping bags to fill tartlets quickly and evenly, which saves time when serving many guests.
These tartlets are small in size but big on comfort and nostalgia. Whether for a holiday table or a quiet afternoon with tea, they bring a warm, familiar sweetness that invites sharing. Try them once, then make them part of your seasonal rotation; they will feel like an old friend at every gathering.
Pro Tips
Roll the refrigerated dough just enough to smooth seams; overworking makes it tough.
Use tart apples like Granny Smith for a firm texture that holds shape during cooking.
Cool the filling slightly before filling shells so the crust does not steam and soften.
This nourishing caramel apple tartlets recipe is sure to be a staple in your kitchen. Enjoy every moist, high protein slice — it is perfect for breakfast or as a wholesome snack any time.
FAQs about Recipes
Can I freeze these tartlets?
Yes. Freeze baked, cooled tartlets in a single layer on a tray, then transfer to a freezer container for up to 3 months. Thaw in the refrigerator overnight and warm in a 300 degrees F oven for best texture.
How do I shape the crusts?
Use a 2 1/2-inch round cutter to cut twenty circles from one sheet of refrigerated dough. Press gently into miniature muffin cups and prick the bottoms with a fork to prevent air pockets.
Tags
Caramel Apple Tartlets
This Caramel Apple Tartlets recipe makes perfectly juicy, tender, and flavorful steak every time! Serve with potatoes and a side salad for an unforgettable dinner in under 30 minutes.
Ingredients
Crust
Filling
Instructions
Prepare and cut crust
Preheat oven to 350 degrees F. On a lightly floured surface roll the refrigerated dough to smooth seams, then cut into twenty 2 1/2-inch circles. Press into greased miniature muffin cups and prick bottoms with a fork. Spray lightly with cooking spray and sprinkle sugar-cinnamon mixture.
Bake shells
Bake until golden brown, 6 to 8 minutes. Cool in pan for 5 minutes then remove to a wire rack to finish cooling so shells firm up before filling.
Cook apple filling
Melt 2 teaspoons butter in a medium saucepan over medium heat. Add diced apples and cook until crisp-tender, 4 to 5 minutes. Stir in sugar, caramel topping, flour, cinnamon, lemon juice and salt. Bring to a boil, cook and stir until sauce thickens and apples are tender, about 2 minutes. Cool for 5 minutes.
Assemble tartlets
Spoon the slightly cooled apple-caramel filling into warmed tart shells to just below the rim. Optionally drizzle additional warmed caramel over each tartlet and serve warm or at room temperature.
Last Step: Please leave a rating and comment letting us know how you liked this recipe! This helps our business to thrive and continue providing free, high-quality recipes for you.
Nutrition
Did You Make This?
Leave a comment & rating below or tag
@whiskia on social media!
Categories:
You might also like...

Savory Baked Meatballs
Tender, herb-laced meatballs baked to juicy perfection with Parmesan and garlic. Perfect over spaghetti, tucked into subs, or served with favorite dips.

Classic Bacon Carbonara Pasta
Creamy, silky carbonara with smoky bacon, peppery bite, and perfectly coated spaghetti. Ready in 25 minutes for a comforting, crowd-pleasing dinner.

One Pot Creamy Garlic Pasta
A rich, silky garlic pasta made in one pan with milk and Parmesan for a fast, comforting dinner that is ready in about 20 minutes.
Did You Make This?
Leave a comment & rating below or tag @whiskia on social media!
Rate This Recipe
Share This Recipe
Enjoyed this recipe? Share it with friends and family, and don't forget to leave a review!
Comments (1)
This recipe looks amazing! Can't wait to try it.
Comments are stored locally in your browser. Server comments are displayed alongside your local comments.

Hi, I'm Victoria!
What's Popular

30-Minute Meals!
Join to receive our email series which contains a round-up of some of our quick and easy family favorite recipes.