
Classic Buckeye Bars

No-bake peanut buttery bars topped with a glossy chocolate layer—an easy, nostalgic treat inspired by Ohio’s beloved buckeye candies.
This recipe for Buckeye Bars has been a holiday staple in my kitchen for years. I first adapted it from a treasured handwritten family note after a cookie-exchange evening went sideways and I needed a fast, no-bake sweet to bring the next day. The resulting bars have the creamy, slightly salty peanut butter base everyone expects, with a thin, glossy chocolate topping that snaps just enough when you bite into it. They capture the same flavors as traditional buckeye candies but in an easier-to-slice, shareable form that travels well to potlucks and parties.
I love these for their texture contrast: a dense, silky peanut butter layer balanced by the clean, cooling finish of chocolate. They hold up at room temperature for a few hours, yet chilling deepens the flavor and gives a cleaner slice for presentation. Whenever I bring these to family gatherings, they disappear fast—neighbors and picky eaters alike keep asking for the recipe. The technique is forgiving, making this a reliable treat when you need something quick, impressive, and nostalgic.
Why You'll Love This Recipe
- Ready in about 30 minutes of hands-on time with no oven required—perfect for last-minute hosting or a quick holiday offering.
- Uses pantry staples: creamy peanut butter, powdered sugar, butter, and chocolate chips—easy to assemble with common brands like Jif, Skippy, or a preferred semi-sweet chip.
- Make-ahead friendly: the bars chill well and develop better sliceability after an hour in the refrigerator, making them ideal for preparing the day before.
- Crowd-pleasing balance of sweet and salty—dense peanut butter base with a thin chocolate top that keeps every bite satisfying without being overly rich.
- Customizable: switch to milk, semi-sweet, or dark chocolate for different flavor profiles and adjust salt or sweet levels to taste.
On my first attempt I packed them into a tin for a neighborhood potluck and returned to an empty container and lots of compliments. Over time I learned to press the base firmly and to temper the chocolate slightly by adding a touch of coconut oil so the finish is glossy but not brittle—small adjustments that make a big difference for presentation.
Ingredients
- Unsalted butter (1/2 cup, softened): Use high-quality stick butter for a smooth, stable base. Softening the butter to room temperature helps it blend evenly into the peanut butter mixture; I use Land O Lakes or Kerrygold when I want a richer finish.
- Creamy peanut butter (1 cup): Choose a smooth, jarred variety such as Jif or Skippy with a little sweetness already incorporated. Skipping natural, oil-separated brands simplifies the texture and prevents the filling from becoming oily or grainy.
- Powdered sugar (2 cups): Also called confectioners sugar; sift if lumpy. This provides structure and the classic toothsome texture in the filling. Do not substitute granulated sugar—powdered sugar dissolves and yields the silky consistency you want.
- Pure vanilla extract (1 teaspoon): Real vanilla adds a background warmth; choose Nielsen-Massey or a quality store brand if available.
- Chocolate chips (1 cup): Semi-sweet is classic, but milk or dark chocolate work too. I often use Ghirardelli semi-sweet chips for a dependable melt and glossy finish.
- Coconut oil or unsalted butter (2 teaspoons): A small fat addition smooths the melted chocolate and improves sheen. Use coconut oil if you want a slightly firmer set, or butter for a silkier mouthfeel.
Instructions
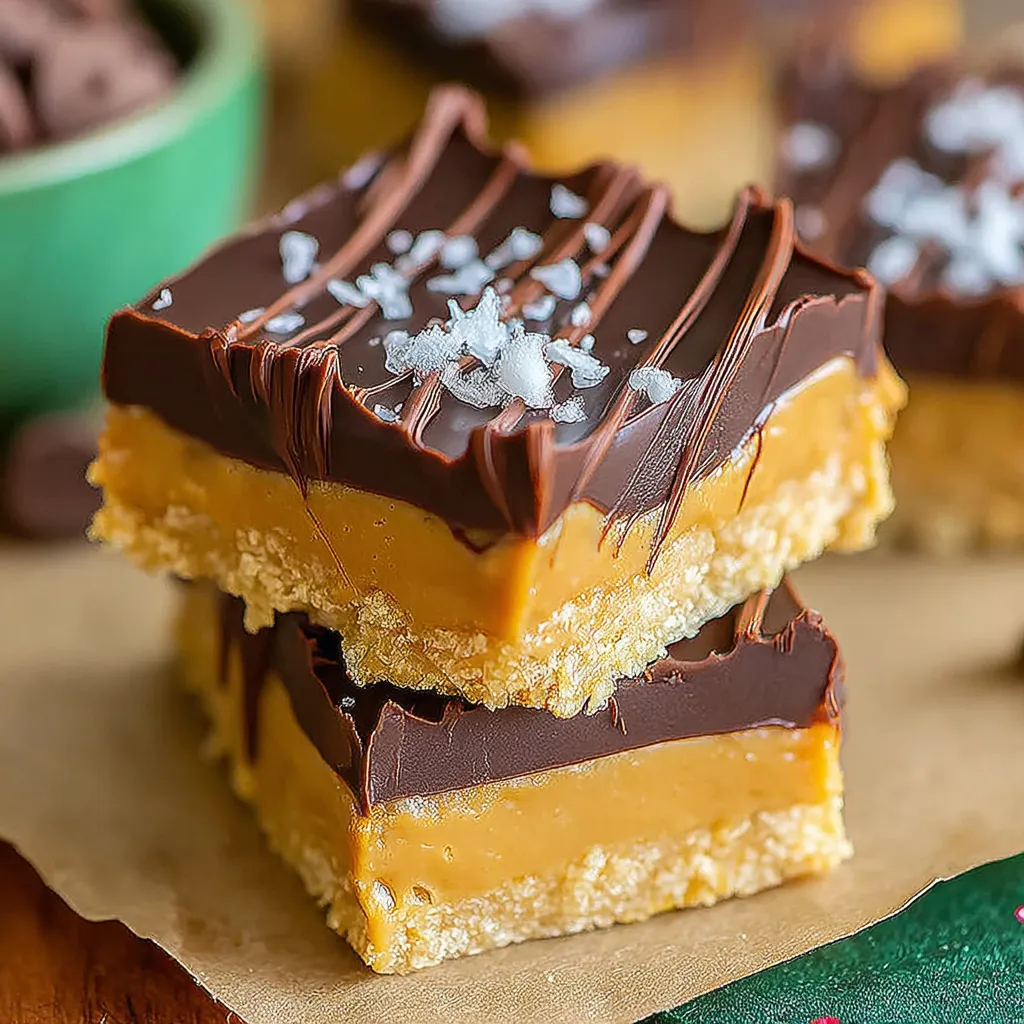
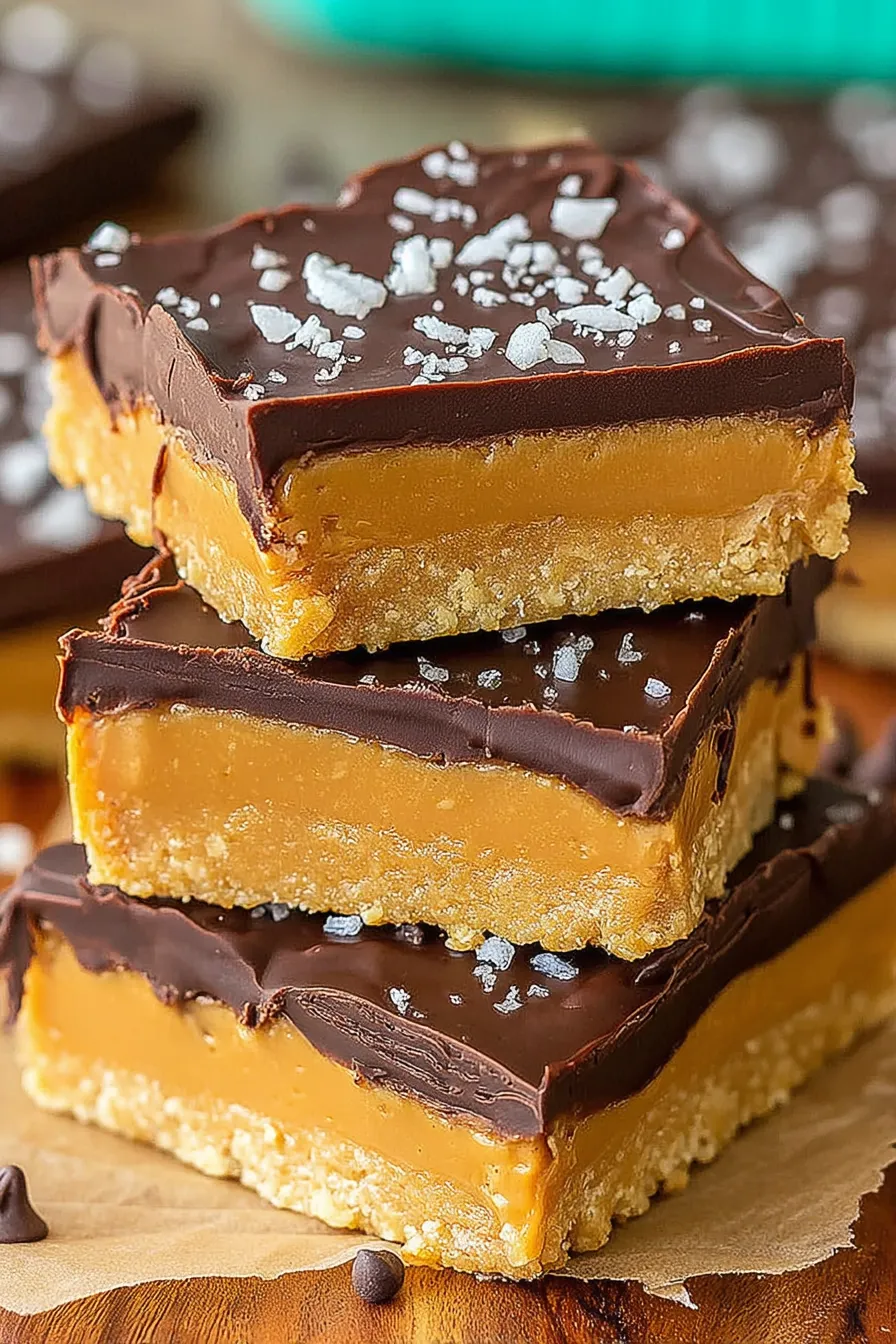
Make the Filling:In a large mixing bowl, combine 1/2 cup softened unsalted butter, 1 cup creamy peanut butter, 2 cups powdered sugar, and 1 teaspoon pure vanilla extract. Use an electric mixer on low-medium speed and mix until the mixture comes together into a thick, cohesive dough—about 1 to 2 minutes. Scrape the bowl once to ensure there are no pockets of dry sugar. The texture should be smooth and slightly pliable but not wet. If it seems too dry, add a teaspoon of milk; if too soft, add a tablespoon of powdered sugar.Press into Pan:Line a 9x9-inch baking dish with parchment paper or foil, leaving an overhang for easy removal. Transfer the peanut butter mixture to the pan and use a rubber spatula or an inverted measuring cup to press it down firmly and evenly into the corners. Firm, even pressure is key: it prevents air pockets and gives clean slices. Aim for a uniform thickness so each bar has the same filling-to-chocolate ratio.Melt the Chocolate:Place 1 cup chocolate chips and 2 teaspoons coconut oil (or melted butter) into a microwaveable bowl. Heat in 30-second increments, stirring between each interval, until the chocolate is fully melted and glossy—usually 60 to 90 seconds total depending on your microwave. Stir vigorously in the last step to smooth out any remaining lumps and to slightly temper the chocolate for a sheen.Top and Set:Pour the melted chocolate over the pressed peanut butter layer and use an offset spatula to spread evenly. Tap the pan gently on the counter to level the chocolate and remove air bubbles. Let the pan sit at room temperature for 20 to 30 minutes until the chocolate firms slightly, then transfer to the refrigerator for at least 1 hour to fully set. Use the parchment overhang to lift the slab from the pan, place on a cutting board, and slice into 12 to 16 bars using a sharp knife warmed under hot water for cleaner edges.
You Must Know
- High in calories and fat—each bar is an indulgent treat; store in small containers to limit serving size.
- These bars freeze well up to 3 months; wrap tightly in plastic and foil to prevent freezer burn.
- Use creamy, stabilized peanut butter (not oil-separated natural brands) for best texture and shelf-stability at room temperature.
- For perfectly even slices, let the slab chill fully and warm your knife under hot water between cuts.
My favorite part is how reliably these turn out even when I’m rushed—no baking means fewer variables. I remember making a double batch for a summer picnic and shipping half to out-of-town family; they called back delighted that the taste was just like homemade buckeyes without the fuss of rolling individual balls. The simplicity makes them ideal for teaching kids about measuring and spreading, and they reliably earn compliments at every gathering.
Storage Tips
Store bars in an airtight container layered between sheets of parchment paper. At room temperature they remain good for up to 48 hours in a cool environment; for longer storage refrigerate for up to 2 weeks. To freeze, place single layers on a baking sheet to flash-freeze for 30 minutes, then stack in a freezer-safe container separated by parchment; they keep well for up to 3 months. Thaw overnight in the refrigerator for the best texture. Reheat briefly at room temperature for 20 minutes before serving to soften the chocolate slightly.
Ingredient Substitutions
If you prefer a dairy-free version, swap the butter for vegan stick butter and choose dairy-free chocolate chips. For a lower-sugar option, reduce the powdered sugar by up to 1/2 cup and add a pinch of fine sea salt to balance sweetness—expect a slightly softer filling. Swap creamy peanut butter for almond butter at a 1:1 ratio for a different nut profile; note that almond butter often has a thinner consistency, so you may need an extra 1/4 cup powdered sugar to achieve the same firmness.
Serving Suggestions
Serve chilled on a simple platter garnished with a light dusting of powdered sugar or chopped roasted peanuts for texture. Pair with black coffee or a nut-forward dessert wine for contrast. For a party, place bars on a tiered tray with labels for chocolate type if you make multiple batches (milk, semi-sweet, dark). They also work well plated with a scoop of vanilla ice cream for an indulgent dessert option.
Cultural Background
These bars are inspired by Ohio’s classic buckeye candies—small, round confections of peanut butter enrobed in chocolate that resemble the buckeye tree nut. Converting them into a bar format makes the signature flavor profile easier to share and slice. Buckeye treats became popular in the Midwest in the mid-20th century and are often associated with holiday gatherings and tailgate tables. This tray-friendly adaptation preserves the nostalgic flavor while saving time and producing a more uniform presentation.
Seasonal Adaptations
In winter, add a pinch of ground cinnamon or a drop of peppermint extract to the filling for holiday flair. For summer gatherings, use darker chocolate and a sprinkle of sea salt on top to cut sweetness. For autumn, fold in 1/4 cup finely chopped roasted pecans into the base. These small adjustments let the same basic method complement seasonal menus without changing the technique.
Meal Prep Tips
These bars are excellent for batch prep. Make a double batch and portion into individual small containers for grab-and-go snacks. Label with date and chocolate type. When prepping for events, assemble the base a day ahead and melt and spread the chocolate the next morning to ensure the surface is pristine. Keep a small disposable offset spatula on hand for quick spreading when time is tight.
These bars are a simple pleasure—quick to pull together, forgiving in technique, and universally loved. Give them a try, personalize the chocolate and salt levels to your taste, and enjoy sharing a little nostalgia in every slice.
Pro Tips
Press the peanut butter layer firmly and evenly to avoid air pockets and to achieve clean slices.
Warm your knife under hot water and dry it before slicing for neater edges.
If the chocolate thickens while spreading, microwave for 10 seconds and stir to loosen.
For glossy chocolate topping, add 2 teaspoons of coconut oil or butter to the chips when melting.
This nourishing classic buckeye bars recipe is sure to be a staple in your kitchen. Enjoy every moist, high protein slice — it is perfect for breakfast or as a wholesome snack any time.
Tags
Classic Buckeye Bars
This Classic Buckeye Bars recipe makes perfectly juicy, tender, and flavorful steak every time! Serve with potatoes and a side salad for an unforgettable dinner in under 30 minutes.
Ingredients
Base
Topping
Instructions
Prepare the Filling
In a large mixing bowl, combine softened butter, creamy peanut butter, powdered sugar, and vanilla. Beat with an electric mixer until smooth, scraping the sides once. The mixture should be thick and cohesive; add a teaspoon of milk if too dry.
Press into Pan
Line a 9x9 inch baking dish with parchment or foil. Transfer the filling and press firmly and evenly into the pan using a rubber spatula or the bottom of a measuring cup to create a smooth, compact layer.
Melt Chocolate
Melt chocolate chips with coconut oil in a microwave-safe bowl in 30 second increments, stirring between each, until glossy and smooth. Stir thoroughly to finish and slightly temper the chocolate.
Top and Set
Pour melted chocolate evenly over the pressed filling, level with an offset spatula, then chill at room temperature briefly before refrigerating for at least 1 hour. Lift from pan using parchment overhang and slice into 12 to 16 bars.
Last Step: Please leave a rating and comment letting us know how you liked this recipe! This helps our business to thrive and continue providing free, high-quality recipes for you.
Nutrition
Did You Make This?
Leave a comment & rating below or tag
@whiskia on social media!
Categories:
You might also like...

Savory Baked Meatballs
Tender, herb-laced meatballs baked to juicy perfection with Parmesan and garlic. Perfect over spaghetti, tucked into subs, or served with favorite dips.

Classic Bacon Carbonara Pasta
Creamy, silky carbonara with smoky bacon, peppery bite, and perfectly coated spaghetti. Ready in 25 minutes for a comforting, crowd-pleasing dinner.

One Pot Creamy Garlic Pasta
A rich, silky garlic pasta made in one pan with milk and Parmesan for a fast, comforting dinner that is ready in about 20 minutes.
Did You Make This?
Leave a comment & rating below or tag @whiskia on social media!
Rate This Recipe
Share This Recipe
Enjoyed this recipe? Share it with friends and family, and don't forget to leave a review!
Comments (1)
This recipe looks amazing! Can't wait to try it.
Comments are stored locally in your browser. Server comments are displayed alongside your local comments.

Hi, I'm Victoria!
What's Popular

30-Minute Meals!
Join to receive our email series which contains a round-up of some of our quick and easy family favorite recipes.