
Copycat Dairy Queen Ice Cream Cake

A homemade version of the classic Dairy Queen ice cream cake: chocolate cookie crust, layered chocolate and vanilla ice cream, hot fudge center, and light whipped cream frosting — perfect for celebrations.
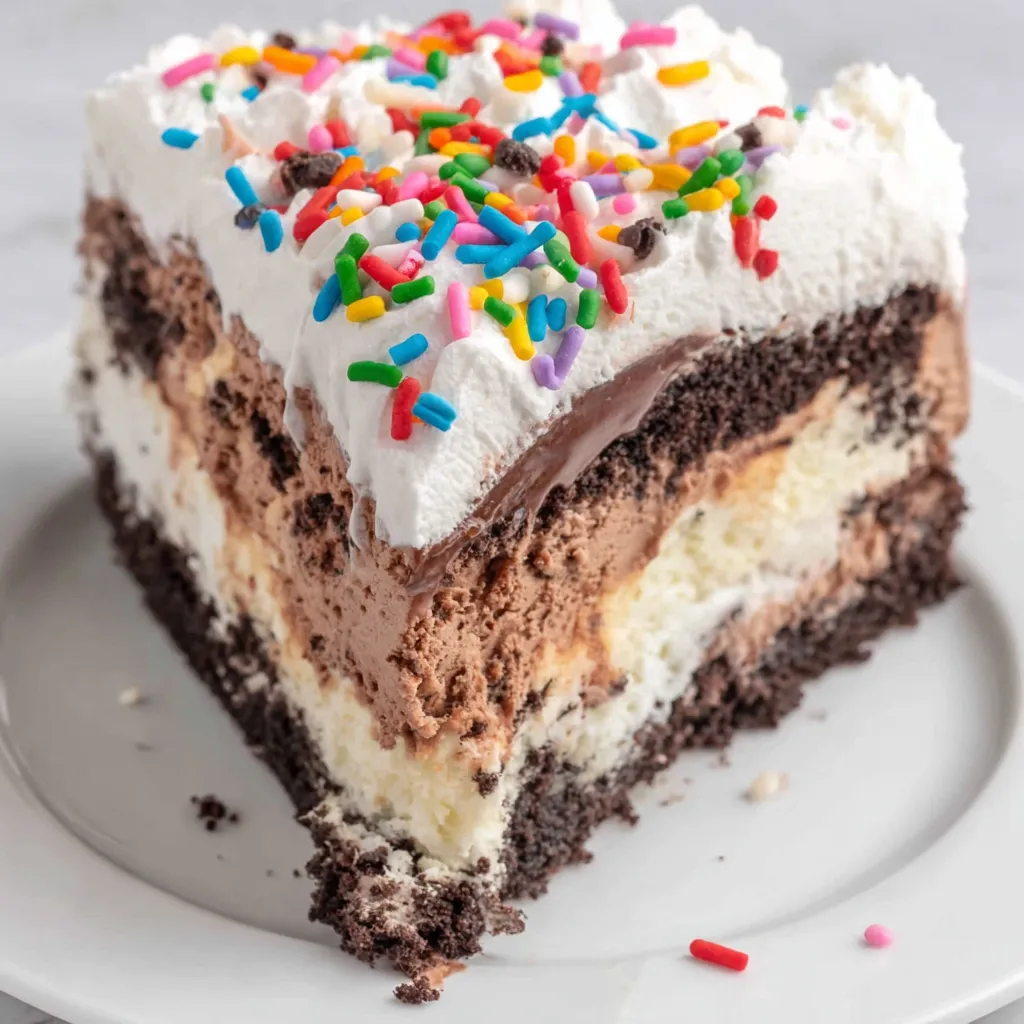
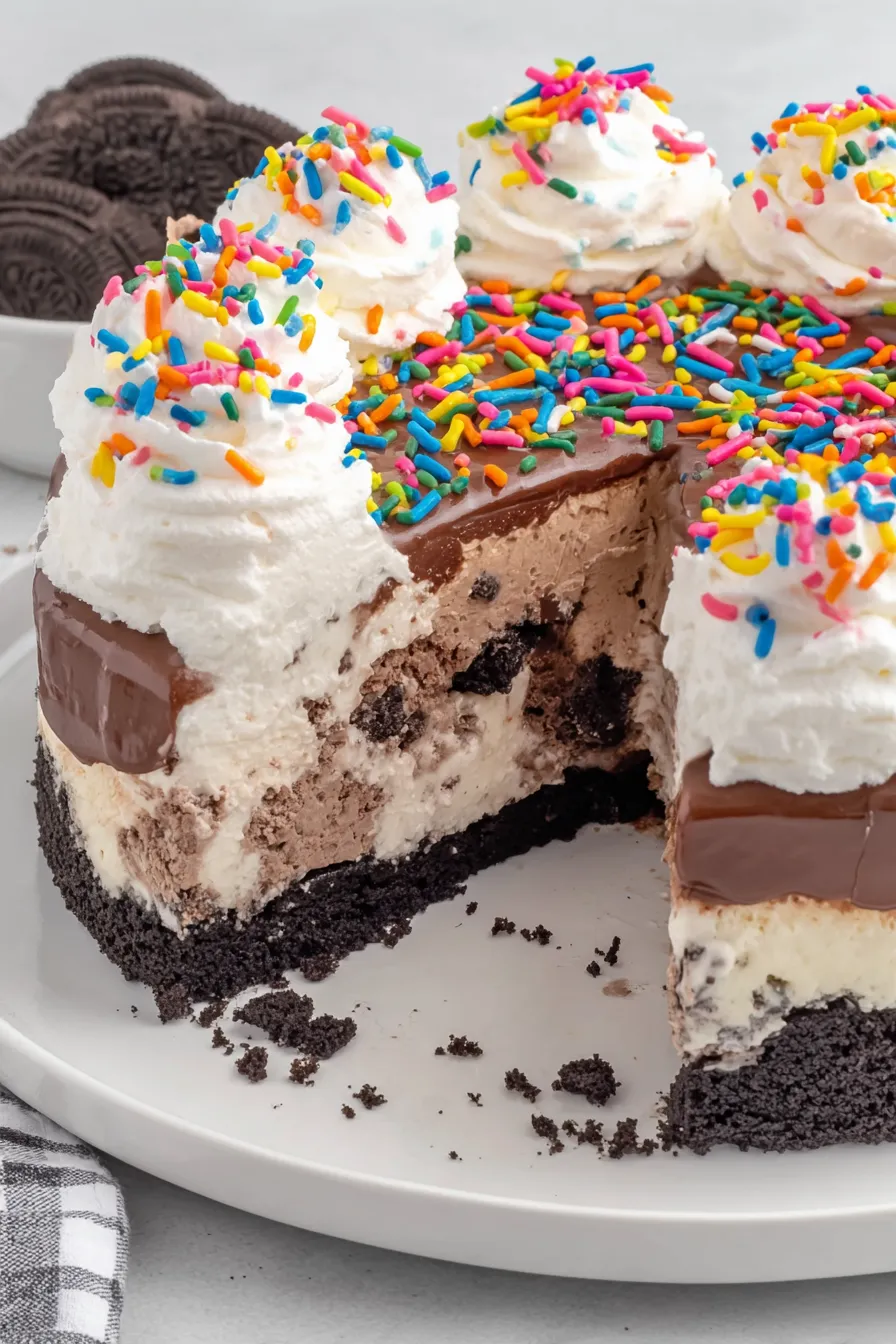
This copycat Dairy Queen ice cream cake is one of those recipes that instantly transports me back to birthday parties, late-summer celebrations, and the small moments when a slice of cold, creamy cake makes everything better. I first developed this version during a weekend when I wanted that exact DQ texture and flavor but with better control over the ingredients. The result is indulgent yet approachable: a crunchy chocolate sandwich cookie base, a dense clay of chocolate ice cream, a glossy hot fudge ribbon, and a pillowy vanilla layer finished with stable whipped cream frosting. Texturally it hits the perfect notes — crisp crumbs, dense creamy ice cream, a fudgy ribbon, and a light frosting that melts on the tongue.
I remember my family gathered around the kitchen island, watching me piece this together. The youngest asked for decorations and left the sprinkle job to the grownups. When we finally sliced into it, the clean layers were a small victory. People often think a homemade layered ice cream dessert is fussy, but this method is forgiving and ideal for make-ahead celebrations. The key is timing the thaws so spreading is smooth and the frosting stays soft but not melty. With a few pantry staples and quality ice cream, you can reproduce that nostalgic Dairy Queen experience in your own kitchen.
Why You'll Love This Recipe
- This dessert uses pantry staples and supermarket ice cream so it is ready with minimal hands-on time; most of the work is assembly while the freezer does the rest.
- It is highly customizable — switch cookie crumbs, ice cream flavors, or fudge brands to suit taste or dietary needs without changing technique.
- Make-ahead friendly: once assembled it keeps well for weeks in the freezer, making it perfect for parties or unexpected guests.
- Quick bake step for cookie crumbs gives the base extra crunch and a toasted flavor similar to the original chain version.
- Requires only simple equipment: a 9-inch springform pan, mixing bowls, spatulas, and a mixer for stable whipped cream.
- Great crowd-pleaser — the combination of chocolate, vanilla, and hot fudge appeals to most palates and suits birthdays or summer barbecues.
From my first test to the hundredth slice served at family gatherings, people consistently comment on the clean layers and nostalgic flavor. It has become my default when someone asks for a classic ice cream cake: reliable, celebratory, and customizable.
Ingredients
- Chocolate sandwich cookies (20): I use standard chocolate sandwich cookies with the cream center (store-brand or Oreos). Crushing them with the center intact gives the crumbs a touch of sweetness and helps them bind when combined with butter.
- Salted sweet cream butter (4 tablespoons, melted): Salted butter enhances the chocolate notes and helps the crumbs set into a crisp layer. Use real butter, melted but not hot, to avoid softening the ice cream later.
- Chocolate ice cream (1 quart): Choose a dense brand like Breyers or Haagen-Dazs for a fudgy, stable layer. Let it soften slightly before spreading to avoid tearing the base.
- Vanilla ice cream (1 quart): I prefer vanilla bean for little flecks of real vanilla and a more complex flavor that contrasts the chocolate. Full-fat ice cream creates neater slices.
- Hot fudge topping (11.75 ounces): A pourable hot fudge works best; Smucker's or similar jars heat to a spreadable consistency and set with a glossy finish.
- Heavy cream (2 cups), powdered sugar (1 1/4 cups), clear vanilla flavoring (1 1/2 teaspoons): These ingredients make a stable, lightly sweet whipped frosting that pipes and holds shape for serving. Clear vanilla keeps the frosting bright white.
- Colorful sprinkles (optional): For a festive finish; use jimmies or nonpareils according to preference.
Instructions
Prepare the Pan and Cookie Base: Line a 9-inch springform pan with plastic wrap, leaving enough overhang to lift the cake later. Preheat the oven to 350°F. Line a 10x15-inch baking sheet with parchment. Combine 20 crushed chocolate sandwich cookies and 4 tablespoons melted salted butter in a bowl until evenly coated. Spread the mixture thinly on the baking sheet and bake 7 to 8 minutes to toast the crumbs and set the butter. Let cool completely — warm crumbs will melt the ice cream layers. Soften and Spread Chocolate Layer: Remove 1 quart chocolate ice cream from the freezer and let it sit 15 to 20 minutes until spreadable but still firm. Spoon into the bottom of the prepared springform and press into an even 1-inch layer with an offset spatula. Return to the freezer for 30 minutes to firm; this prevents the hot fudge from seeping into the base. Warm and Spread Hot Fudge: Heat 11.75 ounces hot fudge in the microwave for 20 to 25 seconds so it becomes pourable but not boiling. Using a silicone or offset spatula, spread an even layer of fudge over the chilled chocolate ice cream. Immediately scatter the cooled baked cookie crumbs over the fudge; the crumbs add crunch and replicate the original texture. Freeze 1 hour to lock the layers. Top with Vanilla Layer: Let the vanilla ice cream soften 15 to 20 minutes before spreading. Remove the pan from the freezer and smooth the softened vanilla ice cream atop the cookie-fudge layer into an even dome or flat top. Freeze 4 to 6 hours or overnight until solid throughout. Make Whipped Cream Frosting: Chill your mixer bowl and beaters for 30 minutes if possible for quicker whipping. Combine 2 cups cold heavy cream with 1 1/4 cups powdered sugar and 1 1/2 teaspoons clear vanilla flavoring. Beat on medium until sugar is incorporated, then high until stiff peaks form, about 3 to 4 minutes. Reserve 1 cup for piping decorations. Assemble and Frost Quickly: Work near the freezer: remove the ice cream cake, release and remove the springform sides, and lift the cake by the plastic wrap onto a serving plate. Use an offset spatula to spread the whipped frosting sides and top. Pipe a border with the reserved frosting and sprinkle with colorful sprinkles. Return to the freezer until serving.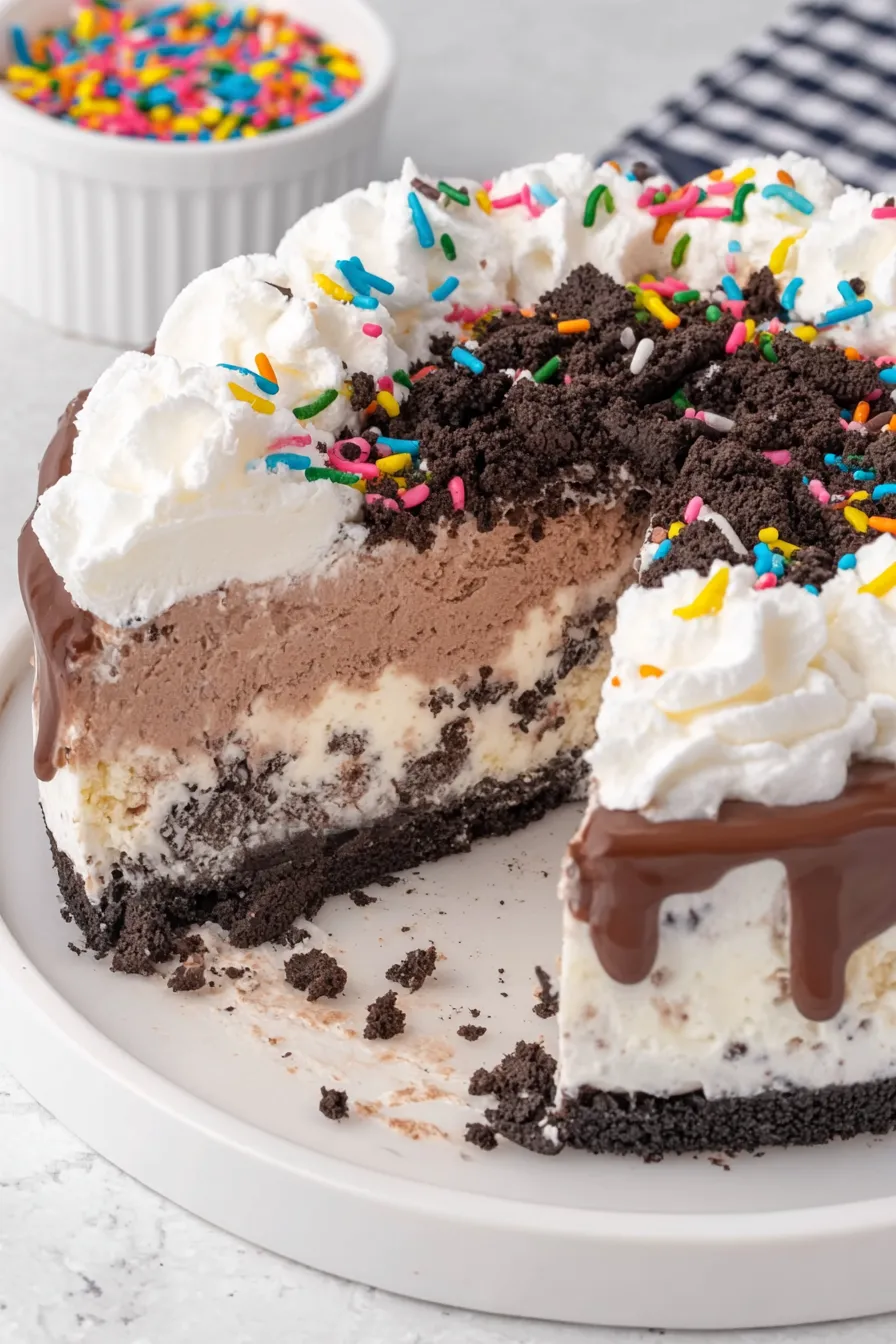
You Must Know
- Store the assembled cake wrapped tightly in plastic and foil; it keeps well in the freezer for up to 3 months without significant loss of texture.
- Letting ice cream sit 15 to 20 minutes before spreading prevents tearing and makes smoothing effortless; avoid melting it entirely.
- Bake the crumbs briefly to remove excess moisture and deepen the chocolate flavor; cooled crumbs maintain a crisp bite between frozen layers.
- The whipped frosting is best applied quickly; keep the cake on a chilled surface and work near the freezer to prevent weeping.
My favorite thing about this cake is how reliably it recreates that classic chain taste while allowing small upgrades like vanilla bean ice cream and homemade fudge if you prefer. Every time I serve it to friends they immediately ask if I bought it or made it — which is high praise. The simplicity of the steps makes it a go-to for last-minute celebrations when you need a showstopper without a lot of stress.
Storage Tips
Wrap the cake in plastic wrap, pressing gently to remove air, then cover with a layer of aluminum foil for long-term storage to prevent freezer burn. Store on a flat shelf in the coldest part of the freezer where temperature fluctuates least. For single slices, wrap individually in plastic and keep in an airtight container; they thaw faster and are easy to serve. To serve, transfer from freezer to fridge for 10 minutes or let it sit at room temperature 5 to 8 minutes for clean slices. Avoid repeated thaw-and-refreeze cycles to maintain texture and flavor.
Ingredient Substitutions
If you need a gluten-free version, use certified gluten-free chocolate sandwich cookies and confirm your fudge is GF. For a dairy-free take, substitute coconut-based ice creams and a dairy-free whipped topping designed to pipe; keep in mind texture will be slightly different. To intensify the chocolate, swap chocolate ice cream for fudge ripple or add 2 tablespoons cocoa powder to the cookie crumbs. For an adult twist, stir 1 to 2 tablespoons of coffee liqueur into the chocolate ice cream while it's softening for depth of flavor.
Serving Suggestions
Serve slices on chilled plates to reduce quick melting. Pair with warm fruit compote, salted caramel sauce, or a small espresso for contrast. Garnish with extra cookie crumbs, shaved chocolate, or toasted nuts for texture. This dessert suits birthdays, end-of-summer barbecues, or just because; serve smaller slices with coffee for a balanced finish after a rich meal.
Cultural Background
The chain-style layered ice cream cake is an American dessert tradition tied to quick-service celebration culture. It blends elements of classic ice cream sandwiches and layer cakes into a portable frozen confection that became a staple for birthdays and graduations. This homemade version respects that commercial format while inviting home cooks to tailor ingredients and presentation.
Seasonal Adaptations
Spring and summer call for bright toppings like fresh berries or citrus curd on the side. In fall, swap vanilla for pumpkin spice ice cream and sprinkle with candied pecans. For winter holidays, incorporate peppermint ice cream, use crushed candy canes as garnish, and pipe festive rosettes with tinted whipped frosting. The method remains the same; you only change flavors and decorations.
Meal Prep Tips
Make the cookie crumb base and bake it up to 48 hours ahead, stored in an airtight container at room temperature. Soften ice creams just before assembly to avoid delays. Freeze the assembled cake overnight for best slicing. Keep a small bowl of hot water nearby when frosting to warm the spatula slightly for smoother spreads. Portion in advance into single servings for grab-and-go treats or packed dessert boxes.
This copycat dessert is reliably festive and simple to scale. With a little planning and high-quality ice cream, you can serve a perfect nostalgic centerpiece that tastes like the original but feels homemade. Invite friends over, put a candle in it, and enjoy every chilled, creamy bite.
Pro Tips
Soften the ice cream just enough to spread; aim for scoopable but still cold to avoid melting the lower layers.
Chill mixer bowl and beaters for faster, more stable whipped cream.
Bake the cookie crumbs briefly to remove moisture and add crunch.
Work quickly when frosting and keep the cake near the freezer to prevent melting.
This nourishing copycat dairy queen ice cream cake recipe is sure to be a staple in your kitchen. Enjoy every moist, high protein slice — it is perfect for breakfast or as a wholesome snack any time.
FAQs about Recipes
How long should the cake freeze before serving?
Freeze the cake for at least 4 hours or overnight for the cleanest slices. If you need to serve sooner, 2 hours will work but slices may be softer.
Can I make a gluten-free version?
Yes. Use certified gluten-free chocolate sandwich cookies and verify hot fudge is gluten-free. Ice cream should also be labeled gluten-free.
Tags
Copycat Dairy Queen Ice Cream Cake
This Copycat Dairy Queen Ice Cream Cake recipe makes perfectly juicy, tender, and flavorful steak every time! Serve with potatoes and a side salad for an unforgettable dinner in under 30 minutes.
Ingredients
Cookie Layer
Ice Cream Layer
Hot Fudge Layer
Whipped Cream Frosting Layer
Instructions
Prepare Pan and Toast Cookie Crumbs
Line a 9-inch springform pan with plastic wrap. Preheat oven to 350°F. Spread crushed cookies mixed with melted butter on a parchment-lined baking sheet and bake 7 to 8 minutes until slightly toasted. Cool completely before using.
Spread Chocolate Ice Cream
Allow 1 quart of chocolate ice cream to soften 15 to 20 minutes. Spread evenly into the bottom of the springform using an offset spatula. Freeze 30 minutes to firm the layer.
Warm and Spread Hot Fudge
Microwave the hot fudge 20 to 25 seconds until pourable. Spread an even layer over the chilled chocolate ice cream, then sprinkle the cooled cookie crumbs over the fudge. Freeze for 1 hour.
Add Vanilla Ice Cream Layer
Soften 1 quart of vanilla ice cream for 15 to 20 minutes and smooth it over the frozen cookie layer. Return the whole pan to the freezer for 4 to 6 hours or overnight until solid.
Make Whipped Frosting and Assemble
Chill mixer bowl. Beat 2 cups cold heavy cream with 1 1/4 cups powdered sugar and 1 1/2 teaspoons clear vanilla until stiff peaks form. Reserve 1 cup for piping. Remove cake from pan, frost quickly, pipe a border, add sprinkles, and return to freezer.
Last Step: Please leave a rating and comment letting us know how you liked this recipe! This helps our business to thrive and continue providing free, high-quality recipes for you.
Nutrition
Did You Make This?
Leave a comment & rating below or tag
@whiskia on social media!
Categories:
You might also like...

Savory Baked Meatballs
Tender, herb-laced meatballs baked to juicy perfection with Parmesan and garlic. Perfect over spaghetti, tucked into subs, or served with favorite dips.

Classic Bacon Carbonara Pasta
Creamy, silky carbonara with smoky bacon, peppery bite, and perfectly coated spaghetti. Ready in 25 minutes for a comforting, crowd-pleasing dinner.

One Pot Creamy Garlic Pasta
A rich, silky garlic pasta made in one pan with milk and Parmesan for a fast, comforting dinner that is ready in about 20 minutes.
Did You Make This?
Leave a comment & rating below or tag @whiskia on social media!
Rate This Recipe
Share This Recipe
Enjoyed this recipe? Share it with friends and family, and don't forget to leave a review!
Comments (1)
This recipe looks amazing! Can't wait to try it.
Comments are stored locally in your browser. Server comments are displayed alongside your local comments.

Hi, I'm Victoria!
What's Popular

30-Minute Meals!
Join to receive our email series which contains a round-up of some of our quick and easy family favorite recipes.