
Easy Sheet Pan Pierogies and Kielbasa

A fast, crowd-pleasing sheet pan dinner of golden pierogies, smoky kielbasa, and roasted vegetables — ready in about 35 minutes and perfect for busy weeknights.
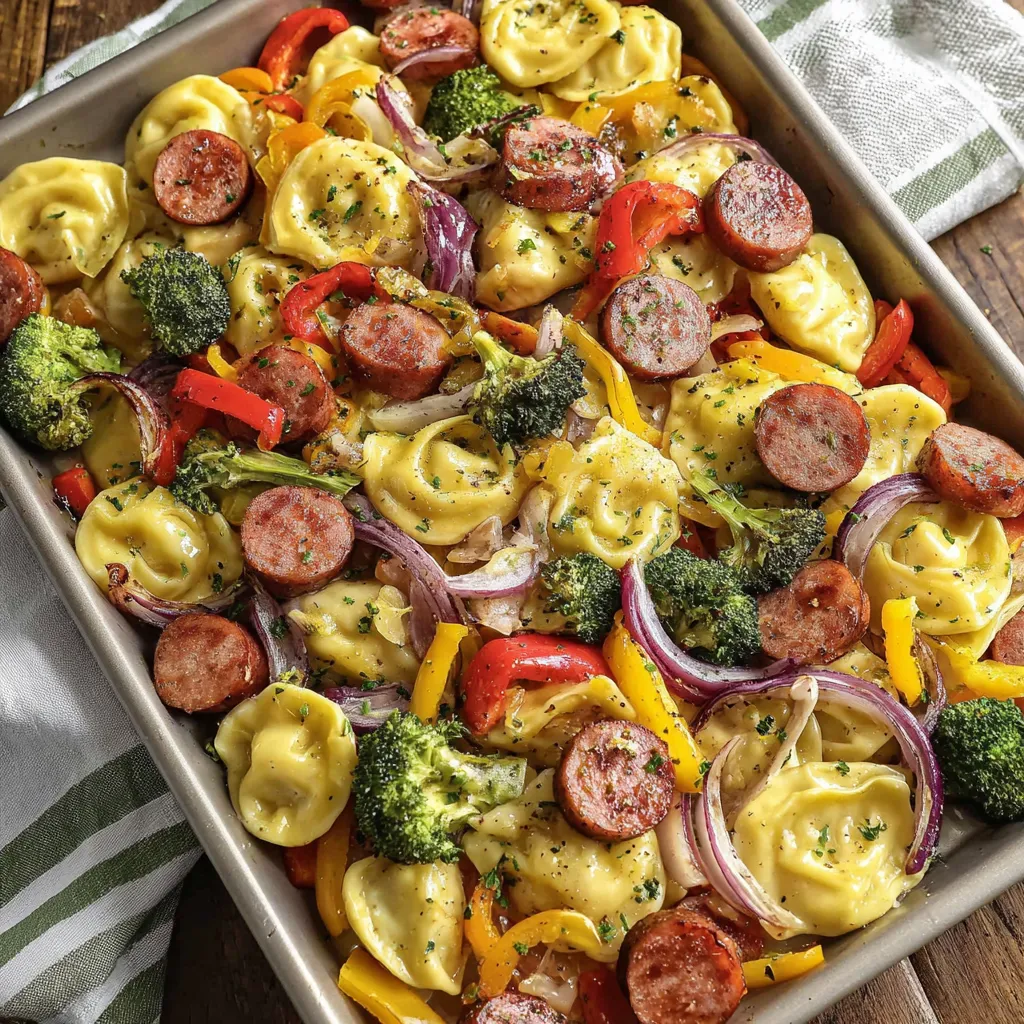
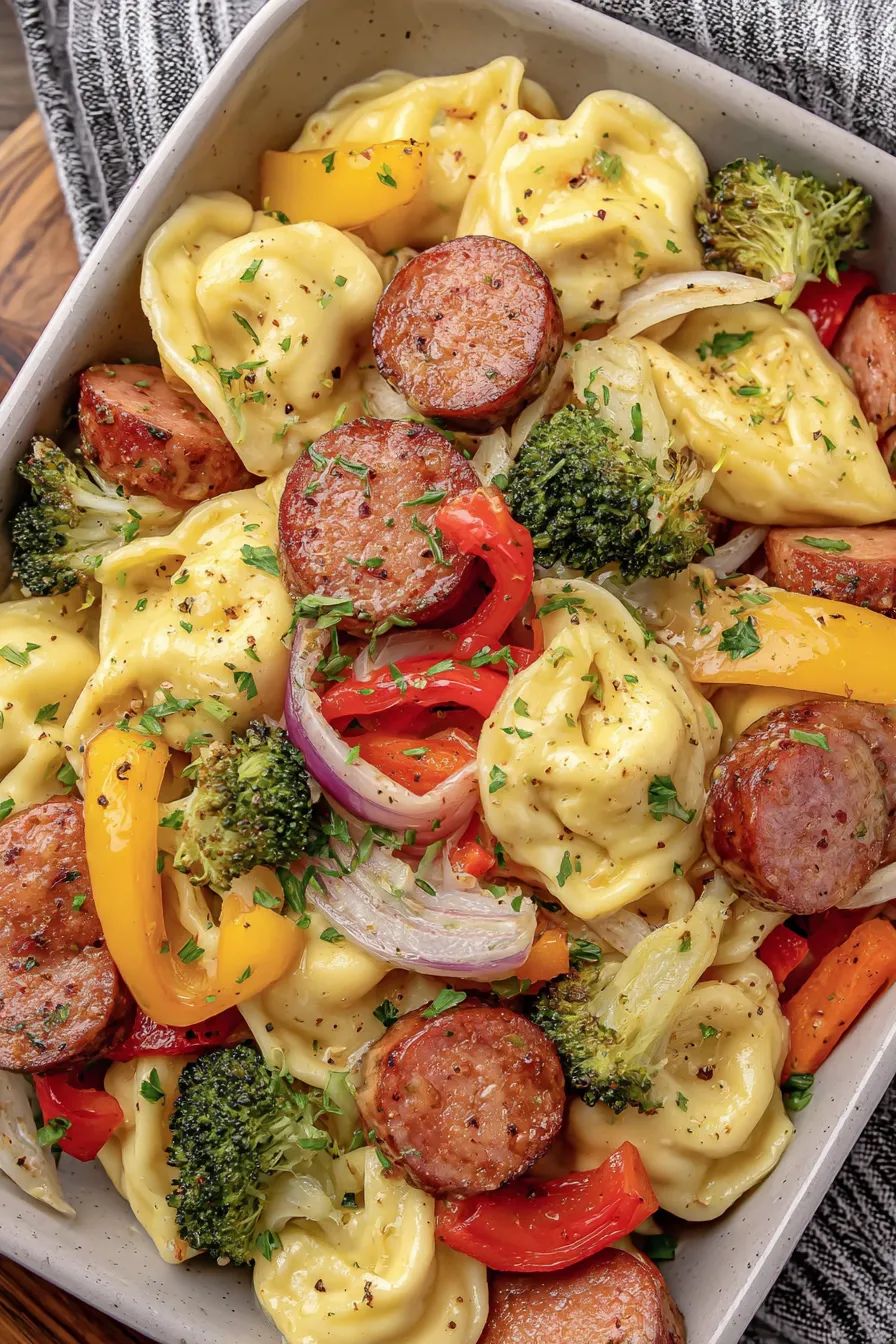
This sheet pan combination of pierogies and kielbasa became my go-to the first week I moved into a tiny apartment with one oven and a stubbornly small kitchen counter. I needed something forgiving, fast, and satisfying that used minimal pots — something that could fill bellies after a long day and still look like I’d put effort into dinner. The moment the pierogies blister and the kielbasa caramelizes, the kitchen fills with a warm, savory aroma; the tender potato and cheese centers of the pierogies contrast beautifully with the snappy, smoky slices of kielbasa. Stovetop pan-frying is great, but roasting everything on a single sheet pan gives a crisp exterior and brings out the peppers’ sweetness without extra babysitting.
I first tried this combination during a week of busy rehearsals when I needed dinner to be ready fast and portable. Friends raved about the golden edges on the pierogies and asked for the recipe before the plates were cleared. What makes this dish special is its simplicity: frozen pierogies transform with just a quick toss in oil and spices, and the kielbasa adds instant depth. It’s an ideal dish for casual dinners, potlucks, or a make-ahead meal for busy weekdays — and it pairs wonderfully with a tangy scoop of sour cream for dipping.
Why You'll Love This Recipe
- Ready in about 35 minutes from start to finish — minimal hands-on time makes it ideal for weeknights or busy evenings.
- Uses pantry and freezer staples: frozen pierogies and kielbasa keep well and cut down on prep time.
- One-pan cleanup: everything roasts together on a single sheet pan, saving time and reducing dishes.
- Kid-friendly and crowd-pleasing — the crispy edges and savory kielbasa appeal to picky eaters and adults alike.
- Flexible: easily adapt for more veggies, swap proteins, or prep ahead for reheating later.
- Flavorful without complicated steps — simple spices and a finishing butter or herbs amplify the finished dish.
I often double this for gatherings and find it travels well when packed into shallow containers. My partner loves when I finish the tray with garlic butter and parsley — it makes the edges glossy and irresistible. Over time I’ve learned small tweaks like slicing the kielbasa thicker when serving as a main and thinner for appetizers; both work, they just change the mouthfeel.
Ingredients
- Frozen pierogies (1 package / 16 oz): Choose potato-and-cheese or your preferred variety; look for plump, evenly sealed dumplings. Thicker, hand-formed varieties take slightly longer to crisp but taste rustic and hearty.
- Kielbasa (12 oz): Use smoked kielbasa or ring sausage for the best flavor. I slice into 1/2-inch pieces so each bite gets a balance of meat and dumpling. Kielbasa brands like Hillshire Farm or local smoked links are great choices.
- Bell peppers (1 red, 1 yellow): Chopped into bite-size pieces. They add color, sweetness, and a bright contrast to the savory components. Choose firm, glossy peppers for crisp roasting.
- Onion (1 medium): Sliced into half-moons; yellow or sweet onion works well. Onions caramelize and add a soft, sweet base note that ties the dish together.
- Broccoli (2 cups florets): Small florets roast quickly and add texture and color. Fresh is best here; if using frozen, thaw and pat dry to avoid sogginess.
- Olive oil (3 tablespoons): Coats ingredients for browning. Use extra-virgin for flavor or a neutral oil if you prefer a milder taste.
- Seasonings: 1 teaspoon garlic powder, 1 teaspoon paprika, 1/2 teaspoon onion powder, 1/2 teaspoon salt, 1/2 teaspoon black pepper — these create a balanced, savory crust when roasted.
- Optional finishes: 2 tablespoons melted butter or garlic butter; 2 tablespoons chopped parsley or green onions; sour cream for serving — these lift the final presentation and add richness.
Instructions
Step 1 — Preheat the oven: Preheat the oven to 425°F. Line a large rimmed baking sheet with parchment paper or lightly grease it with oil to prevent sticking and encourage even browning. A hot oven is essential for crisping the pierogies quickly without overcooking the centers. Step 2 — Prepare ingredients: In a large mixing bowl add the frozen pierogies (no need to thaw), the sliced kielbasa, chopped red and yellow peppers, sliced onion, and broccoli florets. Keeping the pierogies frozen until you toss them with oil helps them crisp rather than steam. Step 3 — Season and oil: Drizzle 3 tablespoons olive oil over the mixture, then sprinkle 1 teaspoon garlic powder, 1 teaspoon paprika, 1/2 teaspoon onion powder, 1/2 teaspoon salt, and 1/2 teaspoon black pepper. Toss thoroughly with tongs or a spatula so every piece is lightly coated — the oil and spices form the crust as they roast. Step 4 — Arrange on the sheet pan: Spread everything on the prepared baking sheet in a single layer, ensuring items aren’t stacked or crowded. Give each piece a little breathing room so hot air can circulate and create even browning. Step 5 — Roast until golden: Roast in the preheated oven for 25–30 minutes, flipping the pierogies and stirring the vegetables and kielbasa once about halfway through. Look for golden-brown edges on the pierogies and caramelized spots on the kielbasa and vegetables — that’s your cue to remove from the oven. Step 6 — Finish and serve: Remove the sheet pan from the oven. If using, drizzle 2 tablespoons melted garlic butter over the hot pierogies and sprinkle 2 tablespoons chopped parsley or sliced green onions. Serve warm with sour cream on the side for dipping.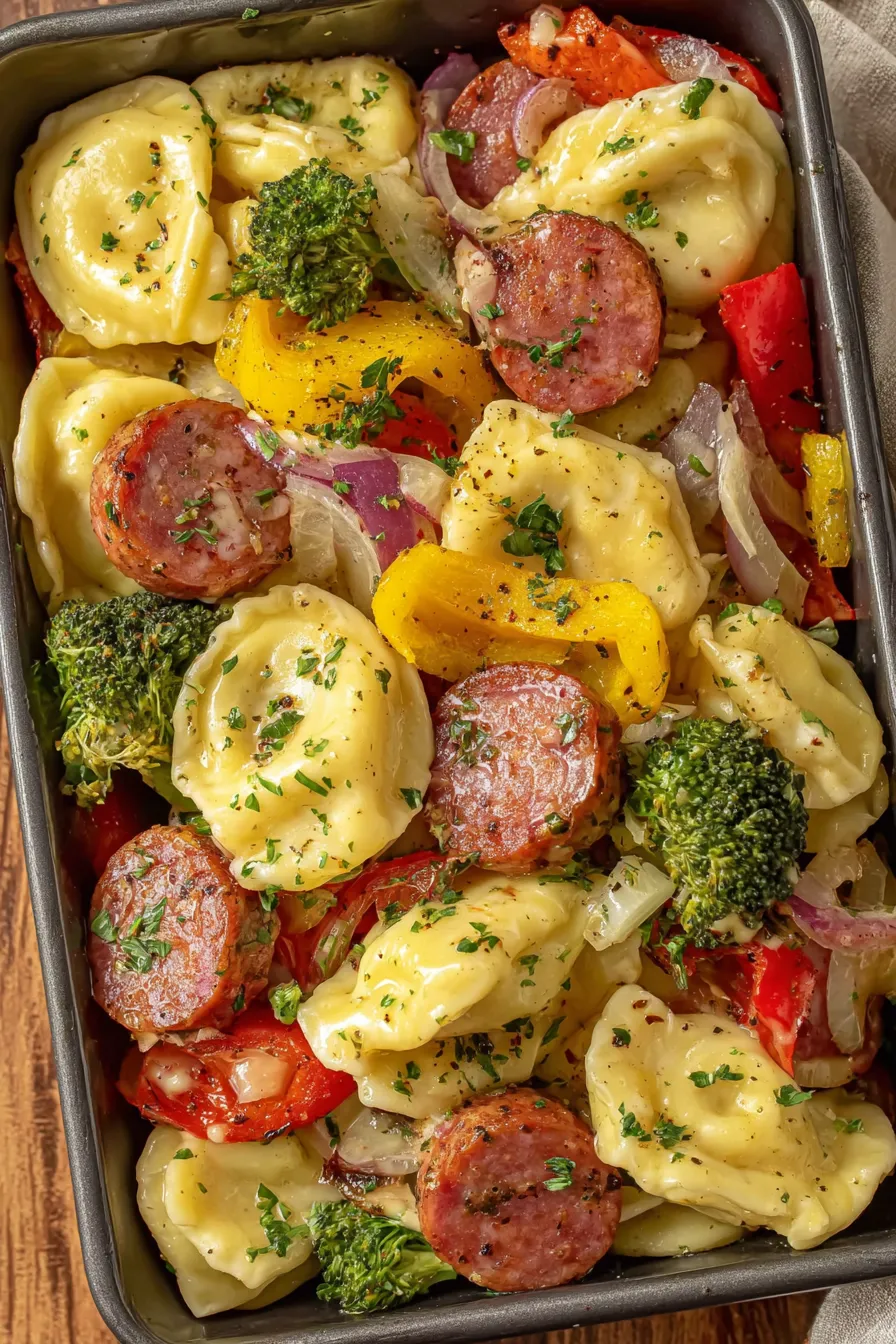
You Must Know
- Frozen pierogies can steam if overcrowded; spread them so hot air reaches each one and you’ll get crisp edges in 25–30 minutes.
- This tray reheats well in a 375°F oven for 8–10 minutes or in a skillet to restore crispness; store leftovers up to 3 days refrigerated.
- Use smoked kielbasa for depth. If your kielbasa is very fatty, pat slices with paper towels before adding so excess grease doesn’t pool.
- High-heat roasting (425°F) encourages caramelization — it’s a quick technique to develop flavor without long cooking times.
One of my favorite aspects of this dish is how forgiving it is: timing can vary a little depending on pierogi thickness and oven hotspots, but a visual check for golden edges and bubbly fillings is always the best indicator. Family members often argue over who gets the crispiest pierogy; that alone tells me the method works. When I’ve served this at casual gatherings, people loved the interactive element of dipping into sour cream and adding a sprinkle of fresh herbs themselves.
Storage Tips
Cool leftovers to room temperature then transfer to airtight containers. Refrigerate for up to 3 days. For longer storage, spread leftovers on a tray and freeze until firm, then move to a freezer-safe bag for up to 3 months. To reheat, thaw overnight in the refrigerator and bake at 375°F for 8–12 minutes until heated through, or pan-fry briefly in a hot skillet to regain crispness. Avoid microwaving from frozen, which makes pierogies soggy.
Ingredient Substitutions
Swap kielbasa for smoked chicken sausage or chorizo for a different flavor profile; reduce added salt if your sausage is salted. For a vegetarian option, replace kielbasa with firm roasted tempeh or seasoned chickpeas. Substitute cauliflower florets for broccoli if preferred — they roast similarly but take on a slightly nuttier flavor. Use unsalted butter if watching sodium, and opt for non-dairy butter and plant-based sour cream to accommodate vegan needs (note: pierogies are often not vegan).
Serving Suggestions
Serve directly from the sheet pan for a rustic presentation or arrange on a platter for guests. Offer bowls of sour cream, whole-grain mustard, or hot honey for dipping. Pair with a crisp green salad and a bright vinaigrette to cut the richness, or serve alongside pickled cucumbers for acidity. For weekend brunch, add a fried egg on top of each pierogy for an indulgent twist.
Cultural Background
Pierogies are Eastern European dumplings with deep roots in Polish, Ukrainian, and Central European cuisines. Traditionally boiled and sometimes pan-fried in butter, they are filled with potato, cheese, sauerkraut, or fruit. Pairing them with kielbasa is a homey combination seen in many American Polish kitchens, blending the dumplings’ comfort with the smoky, preserved flavors of sausage — a marriage of texture and savor that reflects immigrant cooking traditions adapted to pantry ingredients.
Seasonal Adaptations
In spring and summer, toss seasonal vegetables like asparagus tips or halved cherry tomatoes on the sheet pan. In autumn, swap broccoli for roasted Brussels sprouts and add a sprinkle of chopped sage. For winter gatherings, add roasted root vegetables (carrots, parsnips) and finish with a drizzle of maple-butter for a cozy seasonal spin.
Meal Prep Tips
Assemble the seasoned mixture in a shallow container and refrigerate for up to 24 hours if you want to prep in advance; spread on a sheet pan and roast just before serving. For freezer-friendly meal prep, bake a tray, cool completely, then freeze single portions in airtight containers. To reheat, use the oven or a hot skillet for best texture — the oven method restores crispness without overcooking the filling.
This sheet-pan approach is about simplicity and flavor: it turns a few humble ingredients into something communal and comforting. I hope you make it, adapt it, and share it — it’s one of those dishes that invites personalization and rewards small tweaks with delicious results.
Pro Tips
Keep pierogies frozen until you’re ready to roast; this helps them crisp instead of steaming.
Arrange ingredients in a single layer with space between pieces so hot air can circulate for even browning.
Pat kielbasa slices with a paper towel if they appear very fatty to prevent excess oil pooling on the pan.
Flip the pierogies halfway through roasting to develop even golden edges on both sides.
Finish with melted garlic butter and fresh parsley to add gloss and a final layer of aromatic flavor.
This nourishing easy sheet pan pierogies and kielbasa recipe is sure to be a staple in your kitchen. Enjoy every moist, high protein slice — it is perfect for breakfast or as a wholesome snack any time.
FAQs about Recipes
Can I use thawed pierogies?
Yes — you can use thawed pierogies, but they may brown faster and risk becoming mushy. Keep them frozen until ready to toss with oil for best crisping.
How long do leftovers keep?
Store cooled leftovers in an airtight container in the refrigerator for up to 3 days, or freeze for up to 3 months.
Tags
Easy Sheet Pan Pierogies and Kielbasa
This Easy Sheet Pan Pierogies and Kielbasa recipe makes perfectly juicy, tender, and flavorful steak every time! Serve with potatoes and a side salad for an unforgettable dinner in under 30 minutes.
Ingredients
Main
Optional finishes
Instructions
Preheat the oven
Preheat oven to 425°F. Line a large rimmed baking sheet with parchment paper or lightly grease to prevent sticking and encourage even browning.
Prep the ingredients
Place frozen pierogies, sliced kielbasa, chopped peppers, sliced onion, and broccoli florets into a large mixing bowl. Keep pierogies frozen until tossing to avoid steaming.
Season everything
Drizzle 3 tablespoons olive oil over the bowl contents and add garlic powder, paprika, onion powder, salt, and pepper. Toss until evenly coated so the oil and spices form a roasting crust.
Arrange on sheet pan
Spread the seasoned mixture in a single layer on the prepared sheet pan, ensuring pieces aren't crowded to allow hot air circulation for even crisping.
Roast
Bake at 425°F for 25–30 minutes, flipping the pierogies and stirring the vegetables and kielbasa halfway through. Look for golden-brown edges and caramelized spots as doneness cues.
Add finishing touches and serve
Remove from oven, drizzle with melted garlic butter if desired, and sprinkle with chopped parsley or green onions. Serve warm with sour cream on the side for dipping.
Last Step: Please leave a rating and comment letting us know how you liked this recipe! This helps our business to thrive and continue providing free, high-quality recipes for you.
Nutrition
Did You Make This?
Leave a comment & rating below or tag
@whiskia on social media!
Categories:
You might also like...

Savory Baked Meatballs
Tender, herb-laced meatballs baked to juicy perfection with Parmesan and garlic. Perfect over spaghetti, tucked into subs, or served with favorite dips.

Classic Bacon Carbonara Pasta
Creamy, silky carbonara with smoky bacon, peppery bite, and perfectly coated spaghetti. Ready in 25 minutes for a comforting, crowd-pleasing dinner.

One Pot Creamy Garlic Pasta
A rich, silky garlic pasta made in one pan with milk and Parmesan for a fast, comforting dinner that is ready in about 20 minutes.
Did You Make This?
Leave a comment & rating below or tag @whiskia on social media!
Rate This Recipe
Share This Recipe
Enjoyed this recipe? Share it with friends and family, and don't forget to leave a review!
Comments (1)
This recipe looks amazing! Can't wait to try it.
Comments are stored locally in your browser. Server comments are displayed alongside your local comments.

Hi, I'm Victoria!
What's Popular

30-Minute Meals!
Join to receive our email series which contains a round-up of some of our quick and easy family favorite recipes.