
Maple Sticky Buns

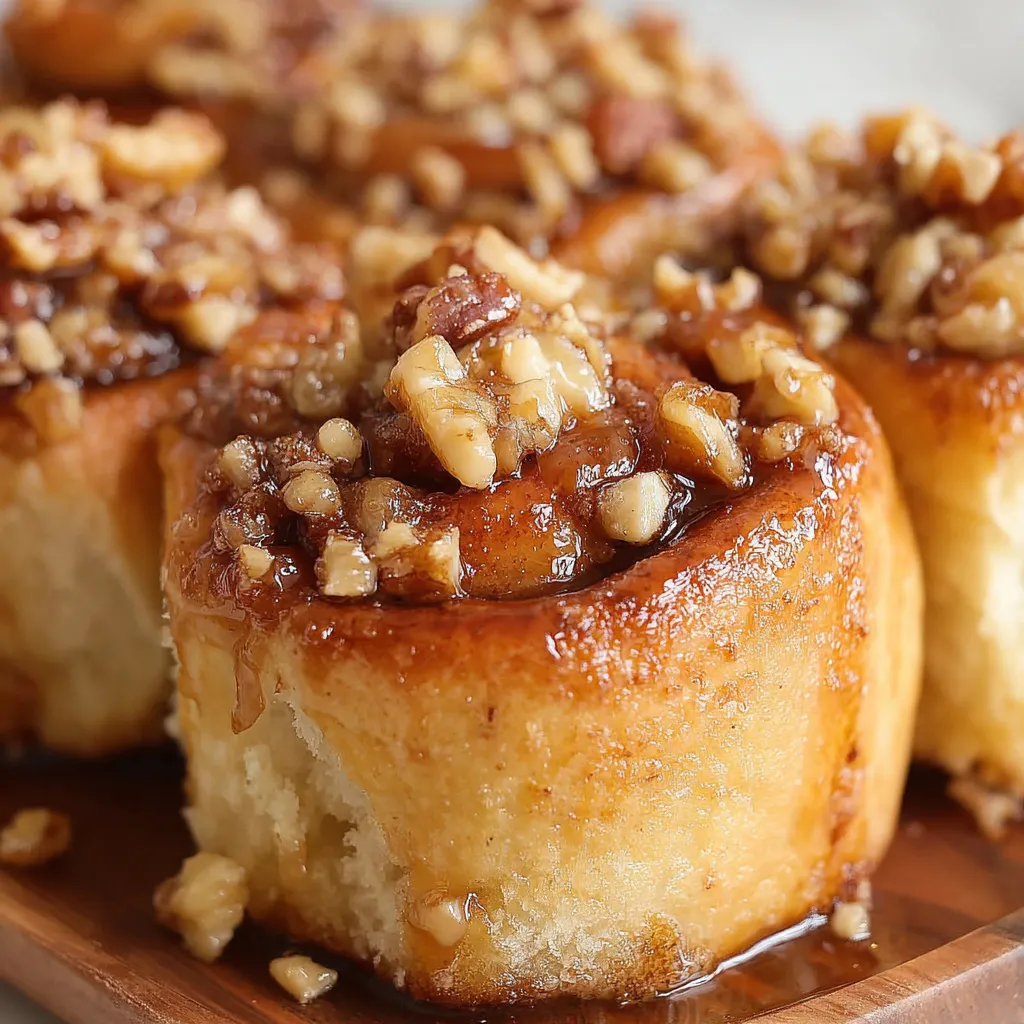
Warm, gooey buns drenched in maple syrup, topped with toasted walnuts and baked until golden. A nostalgic morning treat that keeps well and freezes beautifully.
This recipe has been my weekend favorite for years and it always fills the house with the most irresistible maple aroma. I first adapted these sticky buns on a gray Saturday morning when I wanted something more comforting than coffee and toast. The sweet, sticky base made with pure maple syrup and the tender, slightly enriched dough created the perfect marriage between a breakfast pastry and a dessert. Friends and family began to request these for holiday brunches and during chilly mornings they are the item that prompts everyone to gather around the table.
The texture is what makes these special. The dough is soft and pillowy because of the egg and milk in the mix. The filling combines chopped walnuts and brown sugar into a buttery crumb that becomes deeply caramelized when baked on top of a layer of maple syrup. When inverted out of the pan the buns are glossy and sticky and each bite gives you crisp, nutty edges plus a soft center. I learned to adjust the sugar balance over time so the buns are not cloying but still luxuriously sweet.
Why You'll Love This Recipe
- Ready to enjoy on a cozy morning in roughly one hour of active time plus rising, making it perfect for weekend baking and holiday brunches.
- Uses pantry-friendly ingredients like all purpose flour and brown sugar and highlights pure maple syrup for a distinct deep flavor that store syrups cannot match.
- Make ahead friendly. You can assemble the rolls, refrigerate overnight, and bake the next morning for fresh, steaming buns with minimal morning work.
- Crowd pleaser. Nutty walnuts add crunch and contrast to the glossy sticky topping so these are a hit with both adults and children.
- Versatile. Swap walnuts for pecans, use dark brown sugar for more molasses depth, or add orange zest to the filling for a bright twist.
My family always remarks on the caramelized underside after the pan is inverted. The first time I made these for my in laws they refused to believe I had not bought them from a bakery. Baking these has taught me small lessons about timing, dough feel and the importance of using real maple syrup for authentic flavor.
Ingredients
- All purpose flour 2 1/2 cups spooned and leveled. I use Gold Medal for consistency. The flour is the structure so measure by spooning into the cup and leveling with a knife to avoid a dense dough.
- Salt 1 teaspoon fine. Salt balances the sweetness and strengthens gluten for a better chew.
- Instant yeast 2 1/4 teaspoons quick or rapid rise. If you only have regular instant or active dry, see the proofing note in Instructions for the alternate method.
- Liquid 1/2 cup water plus 1/4 cup milk, at least 2 percent. Warm the mixture to about 105 F to gently activate yeast and enrich the dough without killing the yeast.
- Butter 2 tablespoons for the dough and additional for cutting into the filling and dotting the pan. Salted or unsalted both work but reduce added salt if using salted butter.
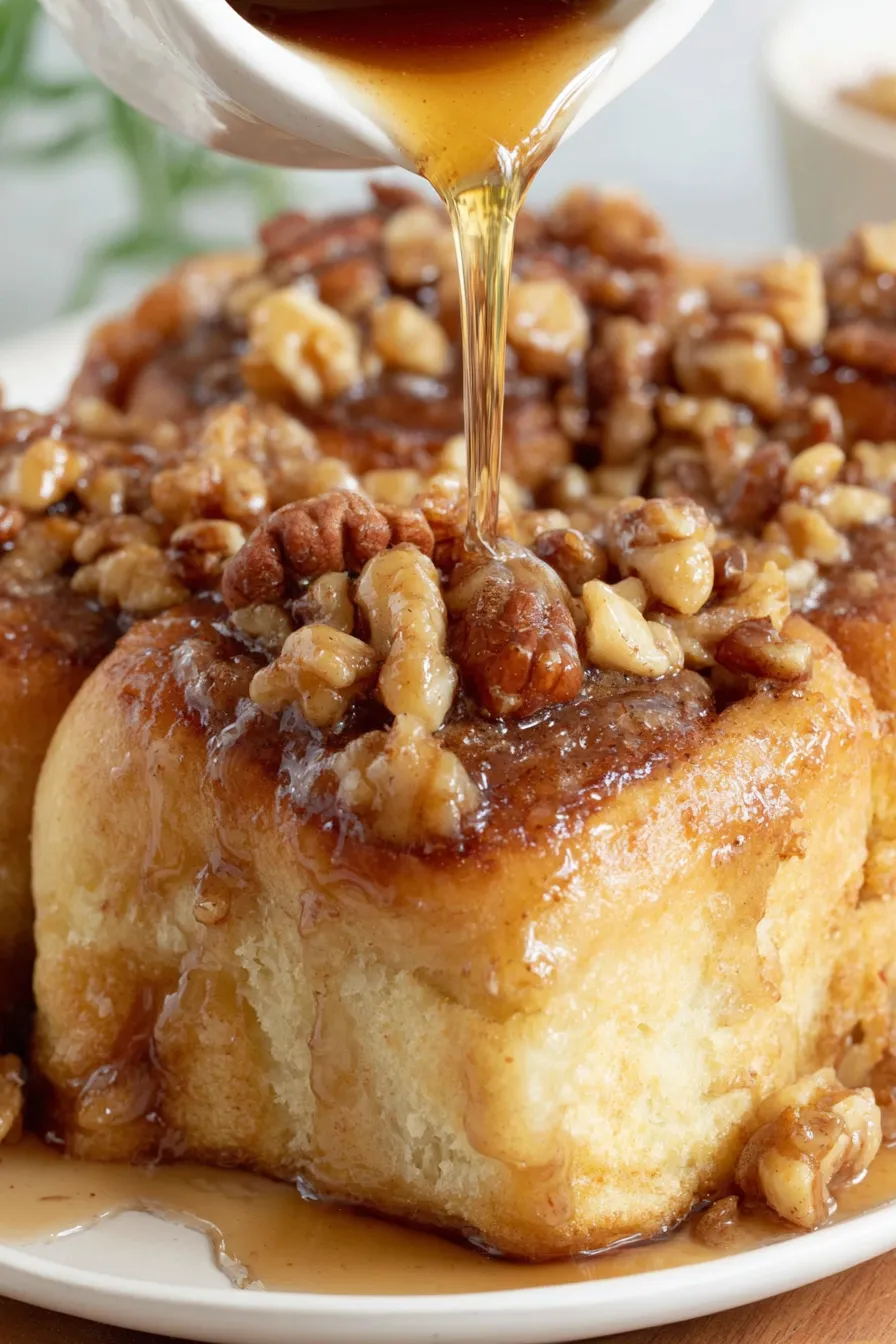
- Maple syrup 1 tablespoon in the dough and 1/2 cup for the pan plus 1 tablespoon in the filling. I prefer a dark Grade B maple for its bold flavor.
- Egg 1 large, room temperature, to tenderize and enrich the dough and help with browning.
- Filling 1/4 cup chopped walnuts, 1/2 cup brown sugar, 1/2 teaspoon cinnamon, pinch of salt, 2 tablespoons cold butter cut into pieces, 1 tablespoon maple syrup.
- Pan topping 1/2 cup pure maple syrup, 1/2 cup brown sugar, 1/4 cup chopped walnuts, 4 tablespoons salted butter cut into small pieces. This combination creates the sticky base that becomes a lacquered topping when inverted.
Instructions
Mix dry ingredientsCombine 2 cups of the flour with the salt and quick rise yeast in a large bowl or the bowl of a stand mixer fitted with the dough hook. Stir to evenly distribute the yeast and salt so the yeast does not touch a large concentrated amount of salt which would slow activation.Warm liquidsIn a small saucepan or microwave, heat the 1/2 cup water, 1/4 cup milk and 2 tablespoons butter until just warm to the touch, about 105 F. Stir in 1 tablespoon maple syrup. If you lack a thermometer aim for warmth similar to a warm bath; too hot and yeast will be damaged.Combine and form doughPour the milk mixture into the dry ingredients, add the egg and mix until combined. Add more flour in small increments until the dough is moist and wraps around the hook cleaning the sides. You want a tacky but not sticky dough. Turn onto a lightly floured surface and knead briefly into a smooth ball. Cover and let rest 10 minutes to relax the gluten for easier rolling.Prepare fillingPulse the walnuts in a food processor to roughly chop. Add brown sugar and the cold butter and pulse until you have an even crumbly mixture. Add 1 tablespoon maple syrup and pulse once or twice until incorporated. The cold butter creates a lightly laminated texture in the filling.Prepare the panGrease an 8 by 8 inch pan well. Pour 1/2 cup maple syrup into the pan and tilt to coat. Sprinkle 1/2 cup brown sugar across the syrup then scatter 1/4 cup chopped walnuts. Dot with the 4 tablespoons of butter pieces. This will become the sticky top after inverting.Roll and cutDeflate the dough on a floured surface and roll to roughly a 9 by 14 inch rectangle. Spread the filling evenly to the edges. Starting from the short side roll tightly into a log. Press the ends so the log measures 9 inches wide. Use a ruler or tape and cut nine 1 inch slices. Place slices cut side up in the prepared pan, cover with plastic and proof until doubled, about 40 to 45 minutes.BakePreheat oven to 350 F. Place the pan on a rimmed baking sheet and bake for 35 to 40 minutes until golden and hollow sounding when tapped. If the tops brown early cover loosely with foil for the remaining time. Remove and allow to rest 5 minutes before inverting.InvertRun a knife around the pan edges to release. Cover a baking sheet with parchment and invert the hot pan onto it. If the buns are reluctant to release give the bottom a few firm taps. Allow to cool to just warm or room temperature before serving so the syrup sets slightly.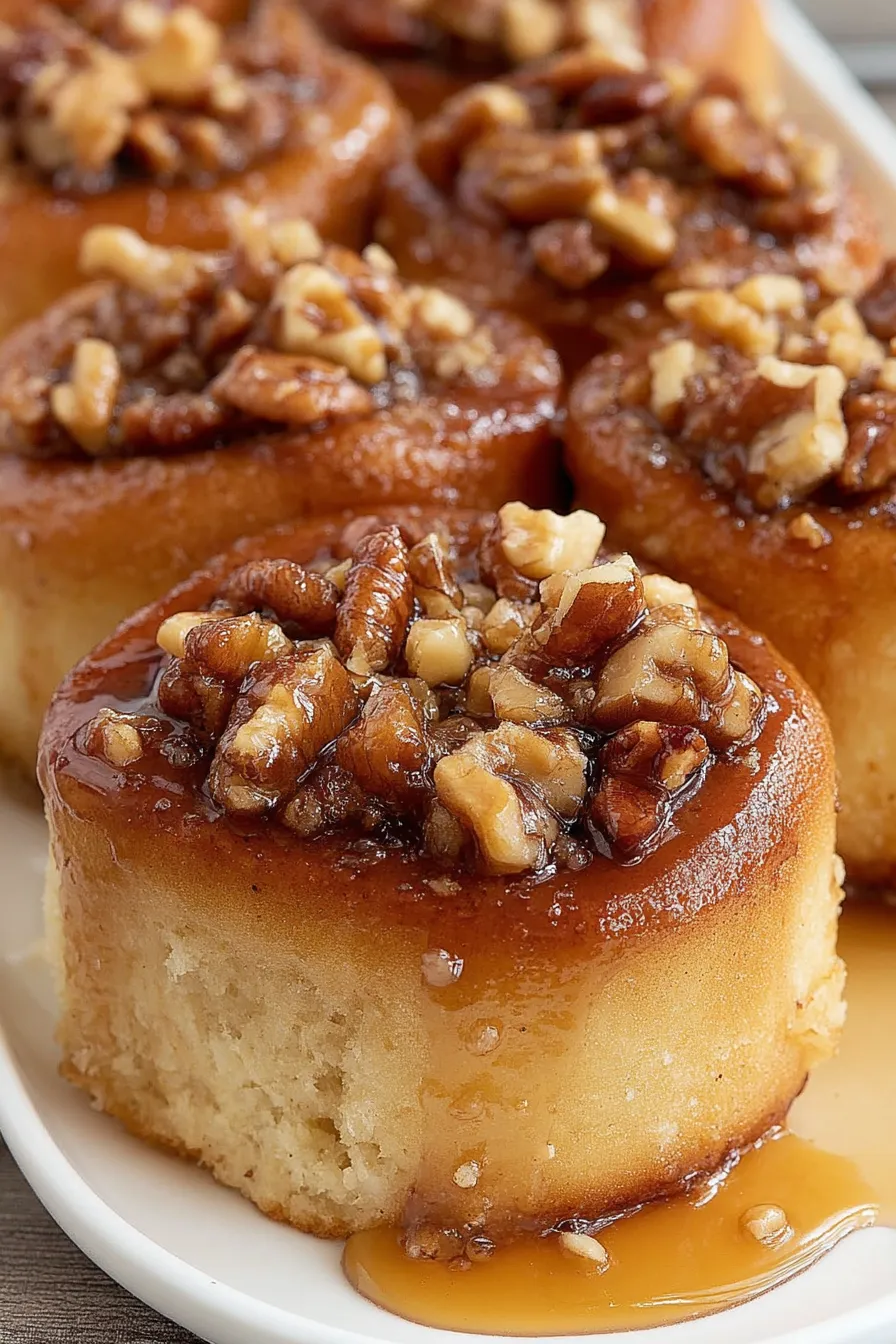
You Must Know
- These buns keep at room temperature in an airtight container for several days and freeze well for up to three months. Thaw overnight in the refrigerator and reheat gently in a low oven.
- Using real maple syrup makes a dramatic flavor difference. Dark Grade B syrup will provide more caramel and maple notes than light syrup.
- If using regular instant or active dry yeast, proof the yeast in 1/4 cup lukewarm water before adding and allow the dough a full first rise until doubled about 30 to 45 minutes.
- For even slices use a serrated knife or dental floss to cut the log, and measure to create nine consistent rolls for even baking.
My favorite bit is the glossy underside once the pan is inverted. During one holiday brunch my niece declared these the best thing I had ever made and requested them for her birthday morning. Every time I make them I tweak little elements like toast level for nuts or the portion of brown sugar and discover new favorites among guests.
Storage Tips
Store cooled buns in an airtight container at room temperature for up to three days. To refrigerate, place in an airtight container and chill for up to a week but know the texture will firm slightly. For longer storage arrange the cooled buns on a tray, freeze until solid, then transfer to a freezer bag for up to three months. Reheat frozen or refrigerated buns in a 300 F oven for 10 to 15 minutes covered with foil to warm through without overbrowning. For a quick microwave reheat slab place one bun on a microwave safe plate and heat 20 to 30 seconds until just warm.
Ingredient Substitutions
Swap walnuts for pecans for a classic North American pairing or omit nuts entirely for a nut free version. Use dark brown sugar for more molasses depth or light brown sugar for a milder sweetness. If you prefer a dairy free option substitute plant based butter and use a nondairy milk such as oat to preserve richness, keeping in mind the flavor will shift away from a pure dairy profile. For a citrus lift add one teaspoon of freshly grated orange zest to the filling; the bright acid balances the sweet caramel.
Serving Suggestions
Serve warm with coffee or a big mug of tea for a weekend breakfast. For a brunch spread pair with scrambled eggs, smoked salmon or a fennel salad for a textural contrast. Garnish with a sprinkle of chopped toasted walnuts and an extra drizzle of maple syrup for presentation. These also work as dessert with a scoop of vanilla ice cream alongside if you want to transform them into a special after dinner treat.
Cultural Background
Maple flavors are deeply tied to New England and eastern Canadian culinary traditions where maple sap is turned into syrup. Sticky buns and similar pull apart breads have roots in European enriched doughs and American pan pastries that emphasize caramelized toppings. Combining maple with enriched dough is a regional adaptation that celebrates local syrup production and the love of sweet, buttery morning breads across North America.
Seasonal Adaptations
In fall and winter emphasize darker syrups and add a pinch of ground cloves or nutmeg to the filling for warming spices. In spring brighten the filling with lemon or orange zest and scatter sliced strawberries on top after baking for a fresh contrast. For holiday occasions add a splash of bourbon to the pan topping before baking to create a boozy caramel note for adult gatherings.
Meal Prep Tips
Assemble the rolls the night before, cover the pan tightly and refrigerate overnight. The cold proof slows the rise and concentrates flavor so in the morning bring to room temperature for 30 minutes, then bake as directed. This technique gives you fresh baked buns with minimal morning work and is perfect for hosting. Use a metal pan for even heat conduction to ensure the caramel sets properly and avoid glass pans which can change baking time.
I hope you enjoy these maple sticky buns as much as my friends and family do. They are forgiving to make and endlessly adaptable. Make them your own by switching nuts, changing sugar, or adding citrus. There is nothing quite like the sound of someone tearing into a warm sticky bun and smiling after the first bite.
Pro Tips
Measure flour by spooning into the cup and leveling with a knife to prevent a dense dough.
If dough is too sticky add flour a tablespoon at a time rather than all at once.
To cut uniform rolls use a ruler and a sharp serrated knife or unflavored dental floss.
Chill assembled pan overnight to bake fresh buns in the morning with minimal effort.
This nourishing maple sticky buns recipe is sure to be a staple in your kitchen. Enjoy every moist, high protein slice — it is perfect for breakfast or as a wholesome snack any time.
Tags
Maple Sticky Buns
This Maple Sticky Buns recipe makes perfectly juicy, tender, and flavorful steak every time! Serve with potatoes and a side salad for an unforgettable dinner in under 30 minutes.
Ingredients
Dough
Filling
Pan topping
Instructions
Mix dry ingredients
Combine 2 cups of the all purpose flour with the salt and quick rise yeast in a large bowl or the bowl of a stand mixer fitted with the dough hook.
Warm liquids
Heat the water, milk and 2 tablespoons butter until just warm to the touch about 105 F. Stir in 1 tablespoon maple syrup.
Combine and knead
Stir the milk mixture into the dry ingredients, add the egg and mix. Add remaining flour a little at a time until the dough is moist and wraps around the hook. Turn onto a floured surface, knead briefly and form into a ball. Cover and rest 10 minutes.
Prepare filling
Pulse walnuts in a food processor, add brown sugar and cold butter and pulse until crumbly. Add 1 tablespoon maple syrup and pulse to combine.
Prepare pan
Grease an 8 by 8 inch pan. Pour 1/2 cup maple syrup into the pan, sprinkle 1/2 cup brown sugar, scatter 1/4 cup walnuts and dot with the 4 tablespoons butter pieces.
Roll and cut
Roll the rested dough into a 9 by 14 inch rectangle, spread filling to edges, roll from the short end into a log, adjust to 9 inches and cut into nine 1 inch slices. Place cut side up in the pan and cover. Allow to rise until doubled about 40 to 45 minutes.
Bake
Preheat oven to 350 F. Place the pan on a rimmed baking sheet and bake 35 to 40 minutes until golden and hollow sounding when tapped. Cover loosely with foil if browning too quickly.
Invert and cool
Run a knife around the pan edges, invert onto parchment covered baking sheet and allow to cool to warm or room temperature before serving.
Last Step: Please leave a rating and comment letting us know how you liked this recipe! This helps our business to thrive and continue providing free, high-quality recipes for you.
Nutrition
Did You Make This?
Leave a comment & rating below or tag
@whiskia on social media!
Categories:
You might also like...

Savory Baked Meatballs
Tender, herb-laced meatballs baked to juicy perfection with Parmesan and garlic. Perfect over spaghetti, tucked into subs, or served with favorite dips.

Classic Bacon Carbonara Pasta
Creamy, silky carbonara with smoky bacon, peppery bite, and perfectly coated spaghetti. Ready in 25 minutes for a comforting, crowd-pleasing dinner.

One Pot Creamy Garlic Pasta
A rich, silky garlic pasta made in one pan with milk and Parmesan for a fast, comforting dinner that is ready in about 20 minutes.
Did You Make This?
Leave a comment & rating below or tag @whiskia on social media!
Rate This Recipe
Share This Recipe
Enjoyed this recipe? Share it with friends and family, and don't forget to leave a review!
Comments (1)
This recipe looks amazing! Can't wait to try it.
Comments are stored locally in your browser. Server comments are displayed alongside your local comments.

Hi, I'm Victoria!
What's Popular

30-Minute Meals!
Join to receive our email series which contains a round-up of some of our quick and easy family favorite recipes.