
Vanilla Bean Crème Brûlée Cheesecake Cupcakes

Buttery cupcakes filled with silky vanilla bean cheesecake and a crisp brûléed sugar top, perfect for elegant gatherings or a cozy dessert night.
This Vanilla Bean Crème Brûlée Cheesecake Cupcake is one of those desserts that suddenly becomes the reason everyone lingers at the table. I discovered this combination on a rainy Sunday when I wanted something both nostalgic and a little fancier than ordinary cupcakes. The idea was simple, pairing a tender, buttery cupcake with a velvety cheesecake center and finishing each one with a glossy, crackling sugar crust like a miniature crème brûlée. The first batch I made vanished within an hour, and my partner called them the best bite of the week.
What makes these so special is the contrast in textures and the way pure vanilla expresses itself. The cupcake base stays light and slightly tender from the sour cream, the cheesecake core is smooth and rich, and the brûléed sugar top adds that magical textural pop. I prefer using vanilla bean paste for flecks of real vanilla that show through, and a good cream cheese with a full flavor for the filling. These are showstoppers for holiday parties, dinner guests, or a calm weekend treat when you want something that looks like it took hours and in truth takes less time with the right steps.
Why You'll Love This Recipe
- This takes classic flavors and elevates them by combining a light cupcake with a rich cheesecake center and a crisp brûlée top for three complementary textures that feel indulgent but not heavy.
- It is surprisingly approachable, ready in about one hour from start to finish when you include assembly and baking, and you can make the components ahead so finishing is quick.
- Most ingredients are pantry and fridge staples, such as all purpose flour, granulated sugar, cream cheese, and butter, so you can pull this together without a special shopping trip.
- Vanilla bean paste gives visual vanilla flecks and intense flavor without scraping pods, and the sour cream in the batter keeps crumb structure tender and moist.
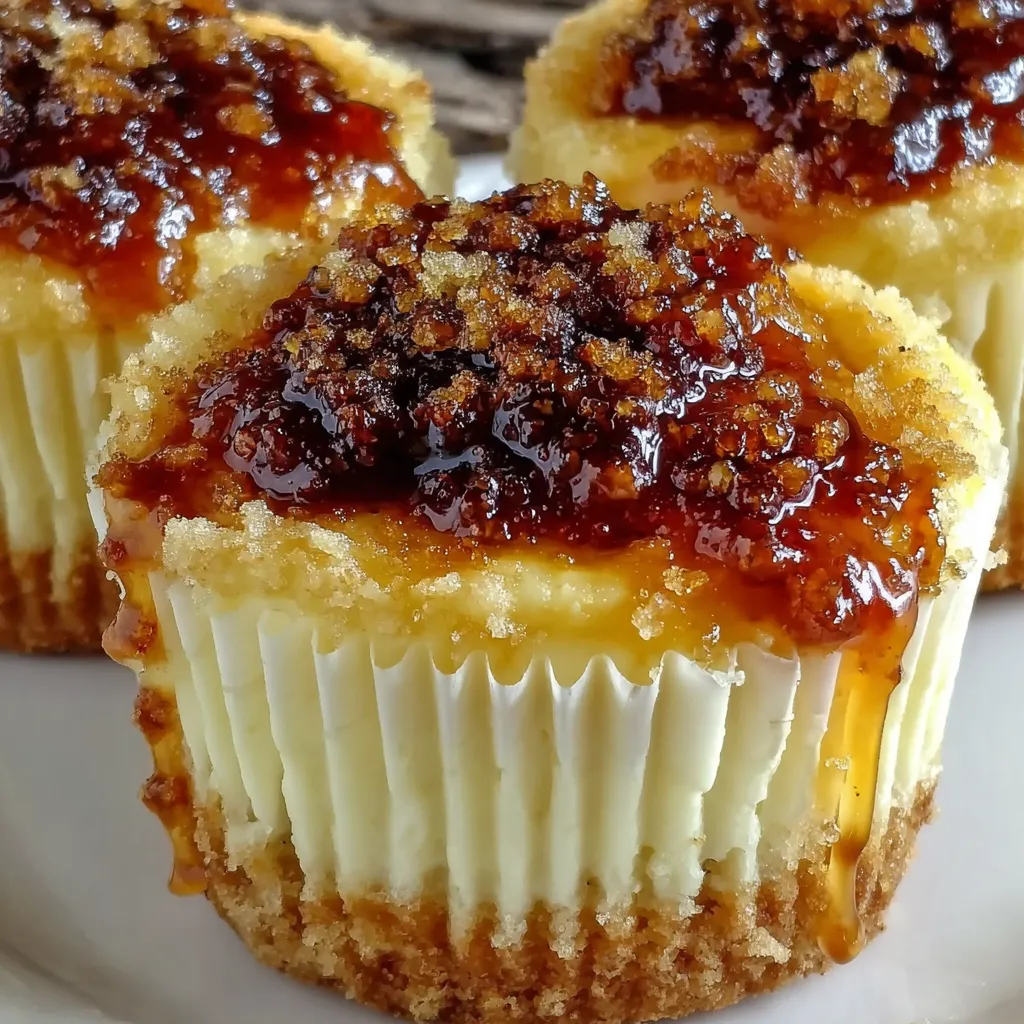
- Brûléeing the sugar creates a dramatic finish that guests will admire, and you can use a handheld torch or a hot broiler for a similar effect.
- The recipe scales well, and you can freeze baked cupcakes without the brûlée for make ahead convenience and caramelize sugar just before serving.
When I first served these at a small family gathering, my mother closed her eyes and said it tasted like a classic pastry shop. That feeling of creating something that prompts that kind of reaction is why I keep this recipe in my rotation. The first time I used a torch to finish them I felt like a pastry chef, and now it is one of the easiest ways I get applause in the kitchen.
Ingredients
- All purpose flour: One cup of all purpose flour gives structure while keeping the crumb light. I like King Arthur brand for consistent results. Spoon and level into the cup to measure accurately.
- Granulated sugar: One half cup in the batter sweetens without weighing the texture down. Use standard granulated sugar for the batter and extra for the brûlée finish.
- Baking powder and salt: Half teaspoon baking powder and one quarter teaspoon salt balance lift and flavor. Fresh baking powder ensures a tender rise.
- Unsalted butter: One half cup softened butter creates a tender, buttery crumb. Use room temperature butter to cream well, about a stick in familiar packaging.
- Eggs: Two large eggs for the batter plus one large egg for the cheesecake filling. Use large eggs at room temperature so they emulsify smoothly with the butter and cheese.
- Vanilla extract and vanilla bean paste: One teaspoon vanilla extract in the batter and one teaspoon vanilla bean paste in the filling. I recommend Nielsen Massey paste for visible vanilla flecks and deep flavor.
- Sour cream: One half cup sour cream adds acidity that tenderizes gluten and keeps the cupcake moist. Full fat gives best texture.
- Cream cheese: Eight ounces softened cream cheese forms the silky filling. Philadelphia brand works reliably, and make sure the block is fully softened to avoid lumps.
- Powdered sugar: One half cup powdered sugar sweetens and smooths the cheesecake center without graininess.
Instructions
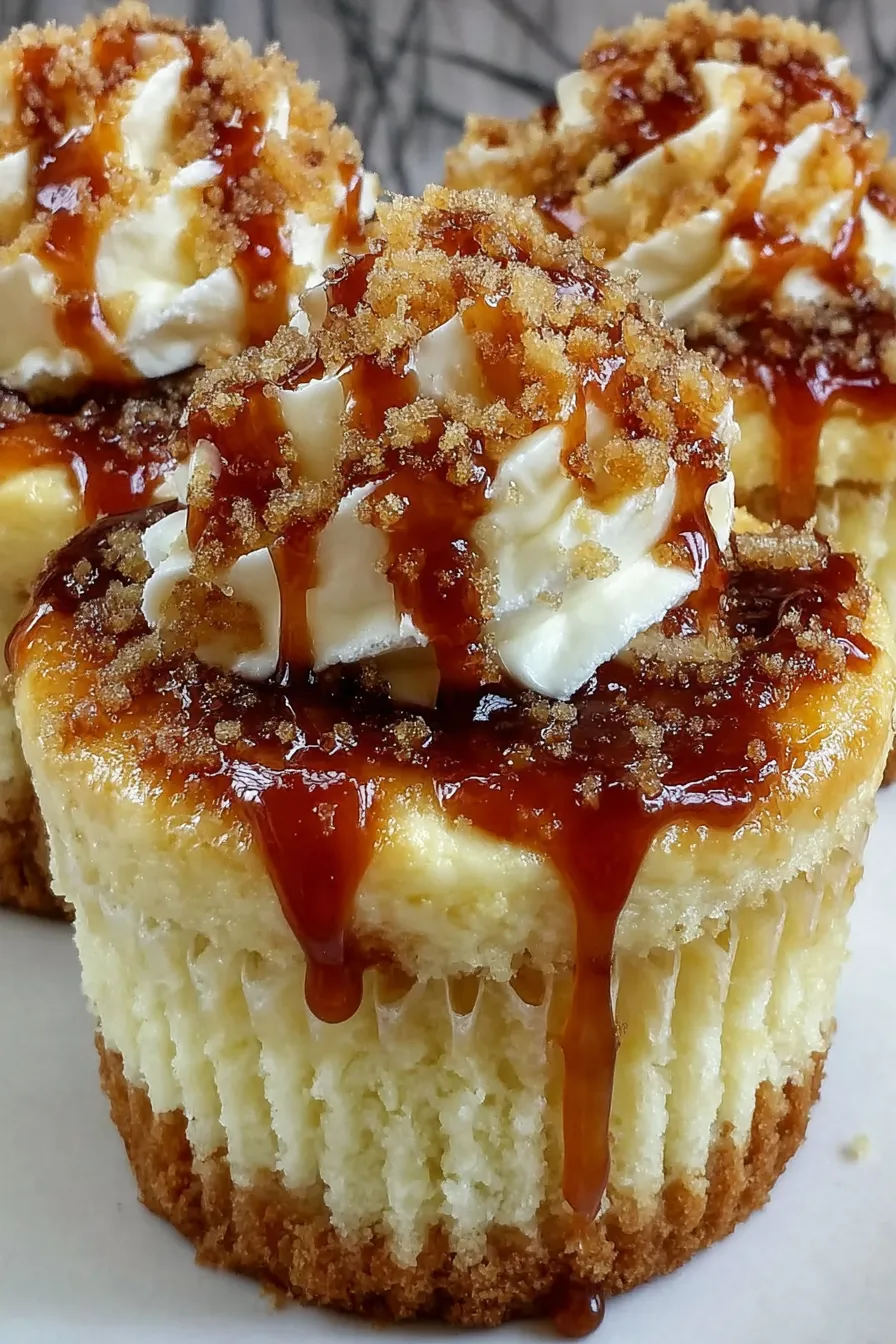
Preheat the oven: Set the oven to 350 degrees Fahrenheit. Position a rack in the center so heat is even. Line a standard 12 cup muffin tin with liners. Preheating ensures reliable oven rise and prevents overbaking the centers. Prepare the dry mix: In a medium bowl whisk together one cup all purpose flour, one half cup granulated sugar, one half teaspoon baking powder, and one quarter teaspoon salt until evenly combined. Whisking distributes the leavening and salt so each cupcake bakes uniformly. Cream butter and wet ingredients: In a mixing bowl beat one half cup softened unsalted butter with an electric mixer until creamy, about one to two minutes. Add two large eggs one at a time, beat after each until incorporated, then beat in one teaspoon vanilla extract and one half cup sour cream. Scrape the bowl to keep the batter uniform and avoid overmixing once flour is added. Combine batter: Fold the dry ingredients into the wet mixture gently until just combined. The batter should be smooth and slightly thick. Overmixing will toughen the crumb. If you see tiny streaks of flour that is okay, they will disappear during brief mixing for the final texture. Make the cheesecake filling: In a clean bowl beat eight ounces softened cream cheese until silky and lump free, about two to three minutes with an electric mixer on medium speed. Add one half cup powdered sugar and one teaspoon vanilla bean paste and beat until smooth. Add one large egg and mix until fully incorporated. The filling should be glossy and thick so it holds its shape when spooned into the batter. Assemble the cups: Spoon batter into each liner to fill about halfway. Add about one tablespoon to one and a half tablespoons of cheesecake filling into the center of each cup. Top with additional batter until cups are about two thirds full. This layering keeps the filling protected and yields a clean cross section when sliced. Bake until set: Bake at 350 degrees Fahrenheit for twenty to twenty five minutes. Start checking at twenty minutes. A toothpick inserted into the cake portion should come out clean or with a few moist crumbs, and the cheesecake center should be set but slightly jiggly. Avoid overbaking to maintain creaminess. Cool completely and caramelize: Let cupcakes cool in the tin for ten minutes then transfer to a wire rack to cool completely. Once cool, sprinkle a teaspoon of granulated sugar on top of each cheesecake center and caramelize using a kitchen torch until sugar melts and forms a golden glassy crust. If you do not have a torch, place the cupcakes under a hot broiler for one to two minutes watching closely until caramelized.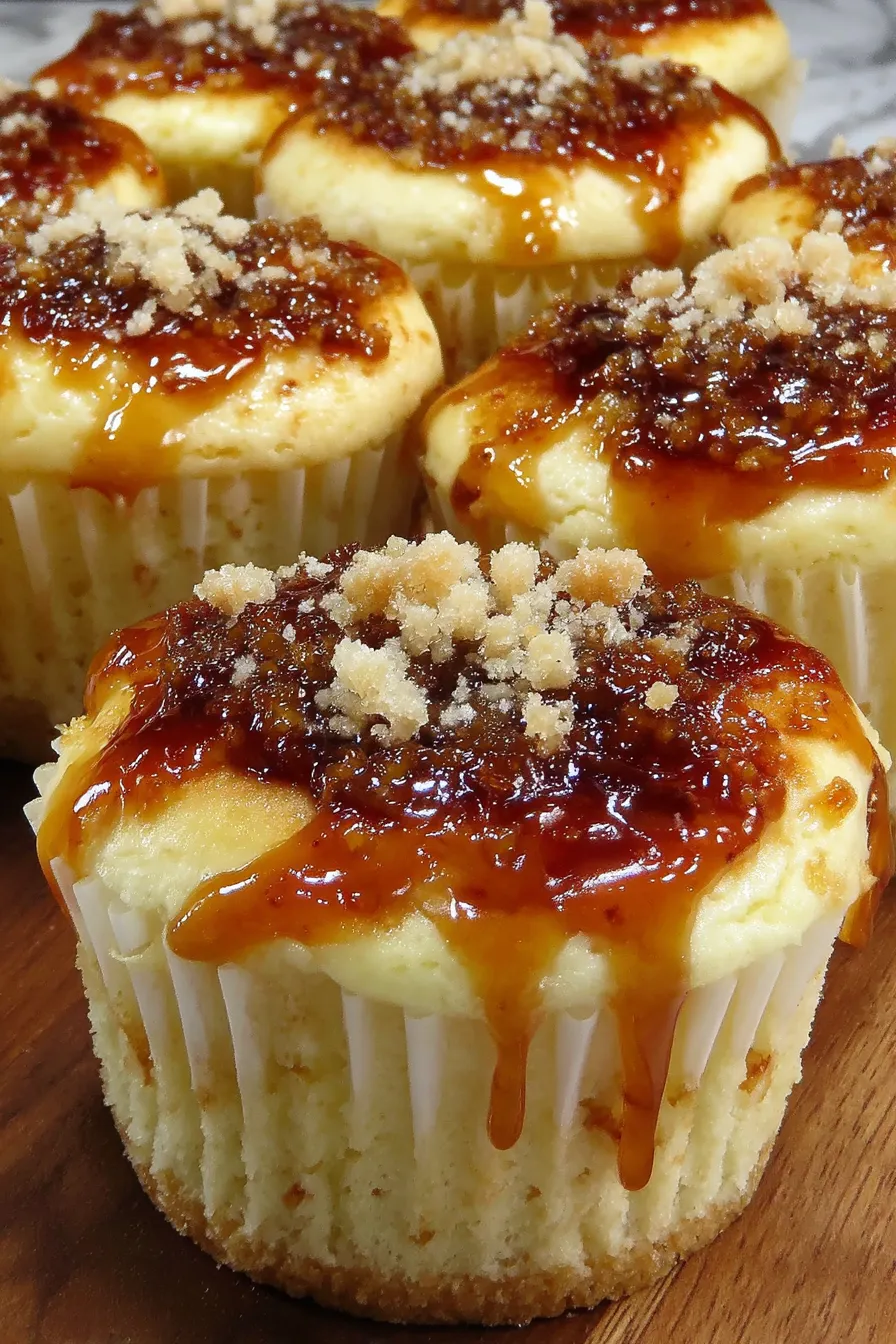
You Must Know
- These are best served the same day you brûlée the sugar to keep that signature crunch, though the baked cupcakes without the caramelized top freeze well for up to three months.
- The cheesecake center should be glossy and slightly wobbly when warm, but it firms as it cools, so rely on visual cues rather than an exact toothpick test for the filling.
- Use room temperature eggs and cream cheese so they emulsify properly and avoid lumps in the filling.
- A handheld kitchen torch produces the most consistent crème brûlée top, but the broiler option works if you keep a close eye to prevent burning.
My favorite part is how the caramelized sugar transforms a humble cupcake into an elegant dessert. Serving these at parties always sparks conversation, especially when guests tap the sugar crust with a spoon. The crunchy surface paired with the silky interior makes every bite feel like a small celebration.
Storage Tips
Store unbrûléed cupcakes in an airtight container in the refrigerator for up to four days. If you have already caramelized the tops, store them uncovered loosely so the crust remains crisp on the first day and move to a covered container thereafter. For longer storage freeze cooled but unbrûléed cupcakes individually wrapped in plastic and placed in a freezer safe bag for up to three months. Thaw overnight in the refrigerator, then bring to room temperature and apply sugar and caramelize just before serving for best texture.
Ingredient Substitutions
If you want a lighter option swap half of the butter for plain Greek yogurt keeping the same volume for moisture and structure. For dairy free try a dairy free cream cheese and vegan butter and swap the egg in the filling for a commercial egg replacer designed for baking, though texture will be slightly different. To reduce sweetness you can use two thirds cup powdered sugar in the filling instead of one half cup and adjust to taste. Using vanilla extract in both batter and filling works, though paste gives the distinctive flecks and deeper vanilla presence.
Serving Suggestions
Present these on a small platter with a few fresh berries and a sprig of mint for color contrast. They pair well with coffee, an espresso shot, or a dessert wine such as a late harvest Riesling. For a party serve on tiered stands and brûlée the tops at the last minute so guests can experience the warm caramel cracking. A dusting of fine powdered sugar on the platter around the cupcakes adds a refined touch.
Seasonal Adaptations
In fall add a quarter teaspoon ground cinnamon to the batter and top with a tiny pinch of flaky sea salt right after caramelizing for a salted caramel note. For summer fold a tablespoon of lemon zest into the batter and replace half of the powdered sugar in the filling with lemon curd for a bright variation. During the holidays mix a pinch of cardamom into the cheesecake filling for a warm aromatic twist that complements vanilla beautifully.
Meal Prep Tips
Make the cupcake batter and the cheesecake filling separately and refrigerate for up to twenty four hours. When ready to bake, assemble and bake as directed. Alternatively bake the cupcakes without caramelizing the sugar, then freeze. On the day of serving thaw, bring to room temperature and torch the sugar tops for an effortless, last minute finish. Use quality liners and a metal tin for even heat distribution when baking in batches.
Success Stories
Readers often tell me these became their go to dessert at book club or small dinner parties. One reader wrote that she brought a platter to a friend who was celebrating a promotion and the cupcakes stole the show. Another shared a photo of a small birthday spread where the caramelized tops glinted like little crowns. These anecdotes remind me that desserts that combine comfort and a bit of theater make lasting memories.
Bring these cupcakes to your next gathering and watch them disappear. The technique is straightforward and the result feels celebratory, a small gift that you can make any night of the week. Enjoy the process and treat yourself to the delicious little luxury of a crème brûlée finish on a cupcake.
Pro Tips
Use room temperature ingredients to ensure smooth batter and filling and prevent lumps in the cheesecake center.
Spoon the filling into the center carefully and keep the batter and filling distinct to get a clean cross section when sliced.
If using a broiler stand the muffins on a rack placed on a baking sheet and watch closely to avoid burning the sugar.
Chill the cream cheese until soft but not warm to maintain a stable filling that holds its shape during assembly.
This nourishing vanilla bean crème brûlée cheesecake cupcakes recipe is sure to be a staple in your kitchen. Enjoy every moist, high protein slice — it is perfect for breakfast or as a wholesome snack any time.
FAQs about Recipes
Can I brûlée the sugar without a kitchen torch?
If you do not have a torch use the oven broiler set to high and watch closely until the sugar melts and turns golden, about one to two minutes.
Can these be frozen ahead of time?
Yes. Freeze fully cooled cupcakes without the caramelized sugar in a single layer, then transfer to a freezer safe bag for up to three months. Thaw in the refrigerator before finishing.
Do the cupcakes need to be cold before brûléeing the sugar?
Let the cupcakes cool completely before applying sugar and using a torch or broiler so the sugar melts evenly and forms a glassy crust.
Tags
Vanilla Bean Crème Brûlée Cheesecake Cupcakes
This Vanilla Bean Crème Brûlée Cheesecake Cupcakes recipe makes perfectly juicy, tender, and flavorful steak every time! Serve with potatoes and a side salad for an unforgettable dinner in under 30 minutes.
Ingredients
Cupcake Batter
Cheesecake Filling
Instructions
Preheat oven and prepare tin
Preheat oven to 350 degrees Fahrenheit and line a 12 cup muffin tin with liners to ensure even baking.
Mix dry ingredients
Whisk together flour, granulated sugar, baking powder, and salt in a medium bowl until evenly combined.
Cream butter and combine wet ingredients
Beat softened butter until creamy, add eggs one at a time, then vanilla extract and sour cream, mixing until smooth.
Combine batter
Fold dry ingredients into the wet mixture until just combined to avoid overworking the batter and tightening the crumb.
Prepare cheesecake filling
Beat cream cheese until smooth, add powdered sugar and vanilla bean paste, then beat in one egg until glossy and fully incorporated.
Assemble and bake
Fill liners halfway with batter, add a dollop of cheesecake filling, top with more batter to two thirds full and bake 20 to 25 minutes.
Cool and caramelize
Cool completely on a wire rack. Sprinkle granulated sugar on each cup and caramelize with a kitchen torch or under a hot broiler until golden and glassy.
Last Step: Please leave a rating and comment letting us know how you liked this recipe! This helps our business to thrive and continue providing free, high-quality recipes for you.
Nutrition
Did You Make This?
Leave a comment & rating below or tag
@whiskia on social media!
Categories:
You might also like...

Savory Baked Meatballs
Tender, herb-laced meatballs baked to juicy perfection with Parmesan and garlic. Perfect over spaghetti, tucked into subs, or served with favorite dips.

Classic Bacon Carbonara Pasta
Creamy, silky carbonara with smoky bacon, peppery bite, and perfectly coated spaghetti. Ready in 25 minutes for a comforting, crowd-pleasing dinner.

One Pot Creamy Garlic Pasta
A rich, silky garlic pasta made in one pan with milk and Parmesan for a fast, comforting dinner that is ready in about 20 minutes.
Did You Make This?
Leave a comment & rating below or tag @whiskia on social media!
Rate This Recipe
Share This Recipe
Enjoyed this recipe? Share it with friends and family, and don't forget to leave a review!
Comments (1)
This recipe looks amazing! Can't wait to try it.
Comments are stored locally in your browser. Server comments are displayed alongside your local comments.

Hi, I'm Victoria!
What's Popular

30-Minute Meals!
Join to receive our email series which contains a round-up of some of our quick and easy family favorite recipes.