
Weeknight Chili Mac

A cozy, skillet one‑pot that's a family favorite — hearty beef, tender pasta, spicy-chile tomatoes and melty cheese come together in under 40 minutes.
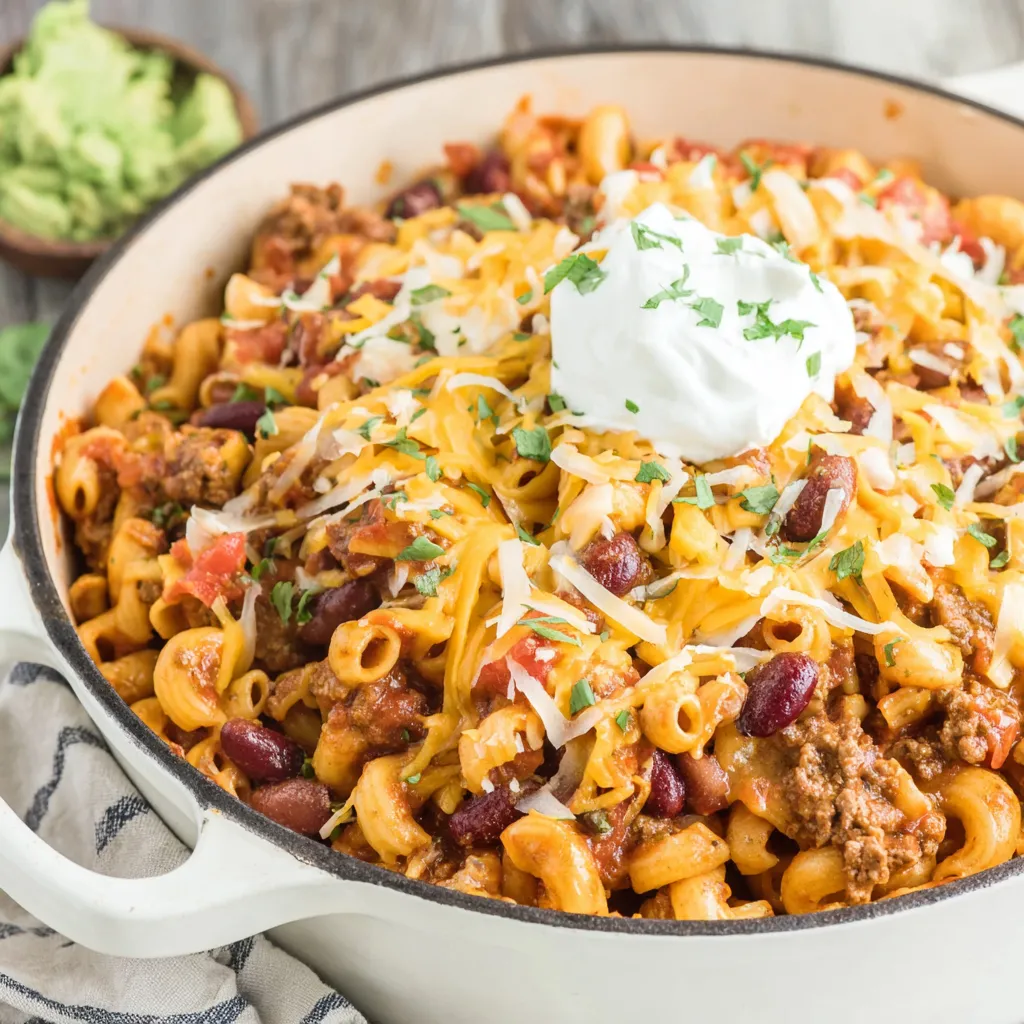
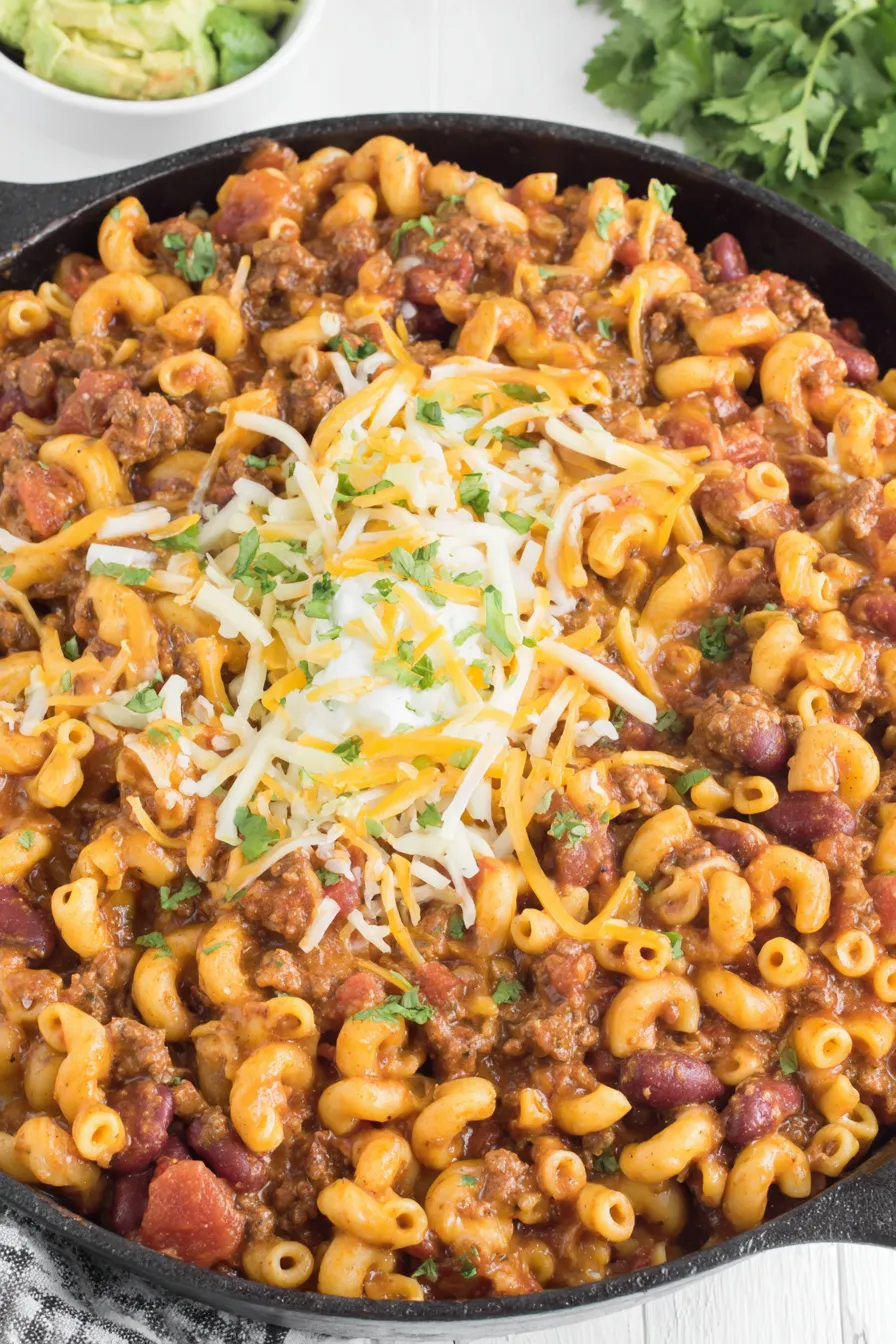
This Chili Mac has been my go-to weeknight rescue for years — the kind of dish that turns a busy evening into something comforting and celebratory at the same time. I first put this combination together when I had a pantry full of basics and hungry teenagers who needed dinner fast. The idea was practical: combine browned beef, a jar of pasta sauce, a can of chiles, chili beans for texture, and elbow macaroni; simmer until tender, then crown it with a generous blanket of cheese. What surprised me was how the flavors melded into something more than the sum of its parts: the sweetness of the tomato sauce, the bright bite from the diced tomatoes with green chiles, and the smoky warmth from the seasoning mix create a satisfying, spoon-stopping meal.
Texture is a big part of why this dish works so well. The tender macaroni carries the saucy, bean-studded beef so every bite has a little chew and a little creaminess from melted cheese. It’s forgiving too — if the sauce thickens while it rests, a splash of beef broth wakes it right back up. I love serving it with a dollop of sour cream, sliced avocado and a handful of corn chips for crunch. This version is intentionally simple, built from pantry staples and approachable ingredients, but it always feels like something special when it shows up at the table.
Why You'll Love This Recipe
- Ready in about 35–40 minutes from start to finish — perfect for busy weeknights without sacrificing flavor or comfort.
- One-pot method means fewer dishes and a rich, cohesive sauce as the pasta absorbs the seasoned beef broth and tomato base.
- Uses pantry staples: jarred pasta sauce, canned diced tomatoes with chiles, and canned chili beans make it easy to assemble any night.
- Make-ahead friendly — it reheats beautifully and freezes well in portions for up to 3 months; just thaw and reheat gently.
- Crowd-pleasing: mild enough for kids yet easily boosted with toppings like hot sauce, chopped jalapeño, or extra chili seasoning for adults.
- Flexible protein options: swap ground turkey, plant-based crumbles, or a mixture of beans to fit dietary preferences.
In my house, this dish has earned its place as a favorite because it reliably gets everyone to the table. Over the years I’ve learned small tweaks — like finishing with cheese off heat so it becomes gooey without separating — that make the texture just right. Guests often ask for the recipe because it feels indulgent and familiar at once.
Ingredients
- Olive oil (1 tablespoon): Use a mild extra-virgin olive oil for sautéing; it provides a neutral, fruity base and tolerates the quick high-heat browning needed for the beef.
- Garlic (2 cloves, minced): Fresh is best — it gives an aromatic backbone. If using jarred, use about 1 teaspoon.
- Onion (1 medium, diced): Yellow or sweet onion adds sweetness and depth; dice finely so it softens evenly while the beef browns.
- Ground beef (1 1/2 pounds): Choose 85/15 for good flavor and a little fat to carry the sauce. Trim if you prefer leaner meat.
- Beef broth (2 cups): Adds savory liquid to cook the pasta and balances the tomato acidity; low-sodium is recommended so you can control salt.
- Pasta sauce (2 cups / about 16 fl oz): A basic marinara or traditional pasta sauce works; choose one with simple ingredients to let the chili flavors shine.
- Diced tomatoes with green chiles (10 oz can): These add brightness and a bit of heat — use mild or hot according to taste.
- Mild chili beans (16 oz, undrained): Provide texture and heartiness; the canning liquid contributes to the overall sauce body.
- Chili seasoning mix (1 packet): A convenient flavor shortcut; substitute 2 tablespoons homemade blend (chili powder, cumin, paprika, oregano, salt) if desired.
- Elbow macaroni (1 box / 16 oz): Regular or small elbow works best; it soaks up sauce and gives a pleasant bite.
- Mexican 4-cheese blend (2 cups, shredded): Cheddar, Monterey Jack and queso blends melt into a creamy topping; use pre-shredded for convenience or shred from blocks for better melt.
Instructions
Heat and brown: Warm 1 tablespoon olive oil in a large skillet or Dutch oven over medium-high heat. Add minced garlic and diced onion, sauté 2–3 minutes until fragrant and translucent. Add 1 1/2 pounds ground beef and cook, breaking into small pieces, until no pink remains and edges begin to caramelize, about 6–8 minutes. Drain excess fat if desired to prevent a greasy sauce. Build the sauce: Reduce heat to medium, then stir in 2 cups beef broth, 2 cups pasta sauce, the 10-ounce can of diced tomatoes with green chiles (do not drain), 16-ounce can of mild chili beans (undrained), and the packet of chili seasoning. Stir to combine, scraping any browned bits from the pan to deepen flavor. Add pasta and simmer: Bring the mixture to a gentle boil, then add the entire box of elbow macaroni. Return to a boil, cover, then reduce heat to a low simmer. Cook uncovered or partially covered, stirring occasionally to prevent sticking, until pasta is tender — approximately 13–15 minutes. If the sauce thickens too quickly before pasta is done, add 1/4 cup of water or broth at a time. Finish with cheese: Remove from heat and immediately sprinkle 2 cups shredded Mexican cheese evenly over the surface. Cover the pan and let sit 2 minutes to allow cheese to melt into a glossy blanket. Stir gently just before serving for a ribboned cheese texture, or leave on top for presentation. Serve and garnish: Scoop into bowls and offer sour cream, sliced avocado and crunchy corn chips (Fritos) at the table. A scattering of chopped cilantro or sliced scallions brightens the dish if you like.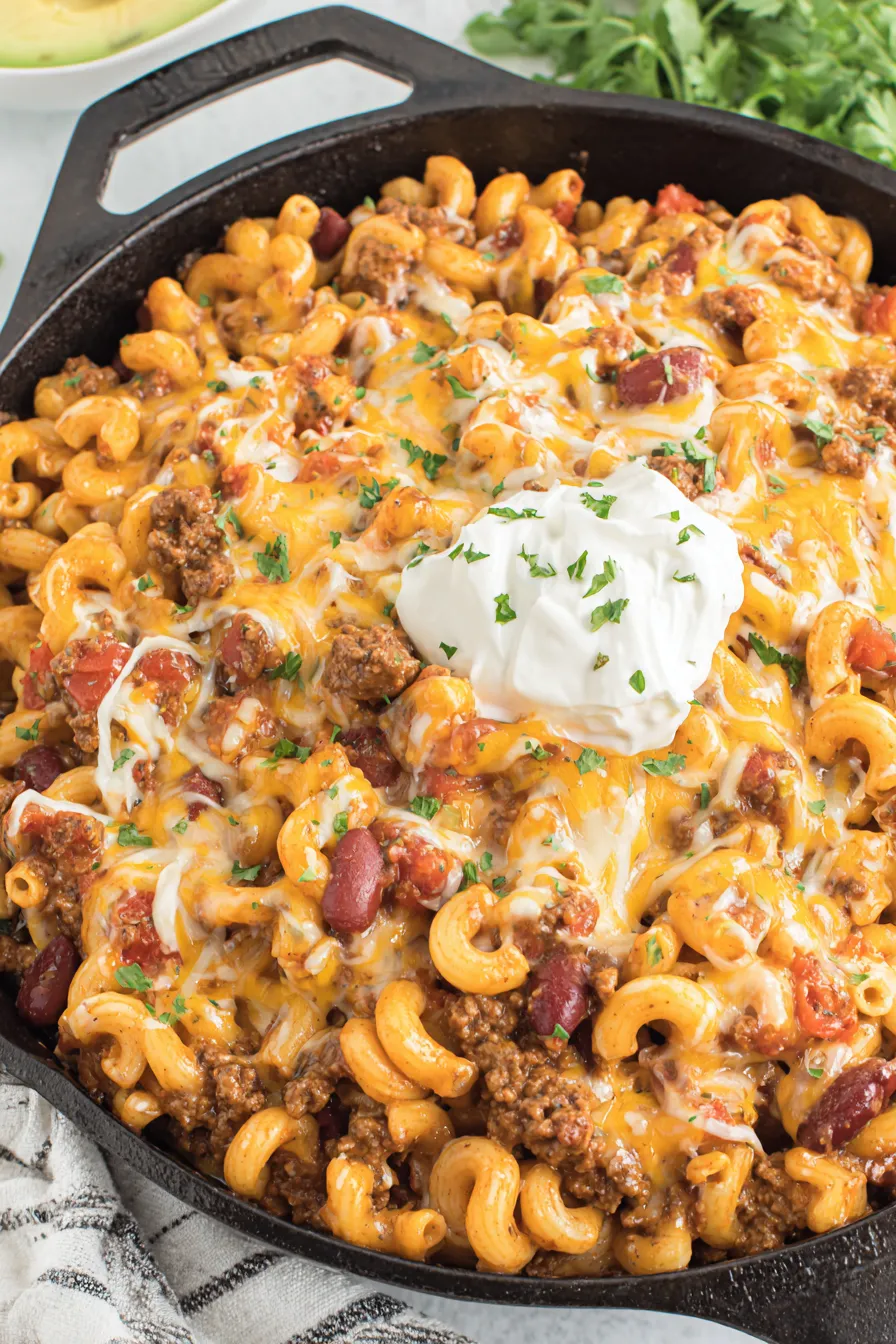
You Must Know
- High in protein and fiber thanks to the beef and beans; makes a filling main that keeps well as leftovers.
- Refrigerate leftovers in an airtight container for up to 4 days; freeze individual portions for up to 3 months.
- Because pasta absorbs liquid as it rests, leftovers may thicken — loosen with a splash of broth or water when reheating.
- To reduce sodium, choose low-sodium broth and no-salt-added canned ingredients and taste before adding table salt.
- If you need a gluten-free option, substitute corn or rice pasta and check beans and seasoning for cross-contamination labeling.
My favorite part is the way the cheese melts into the sauce — it transforms the texture and brings everyone to the table. Once, I brought this to a potluck and people kept coming back for seconds; someone even commented that it tasted like a nostalgic diner dish, which felt like high praise for such a humble, pantry-driven meal.
Storage Tips
Cool the dish to near room temperature within two hours, then transfer to airtight containers. In the refrigerator it will keep well for 3–4 days. For longer storage, portion into freezer-safe containers and freeze for up to 3 months — label with the date. When reheating from frozen, thaw overnight in the fridge if possible, then warm gently on the stovetop with a splash of beef broth to restore a saucy consistency, stirring frequently. Microwave reheating works fine for single portions; cover loosely and heat in 60-second intervals, stirring between, until evenly hot.
Ingredient Substitutions
Swap ground turkey or chicken for beef to reduce fat; use a plant-based ground alternative for a vegetarian option and replace beef broth with vegetable broth. For dairy-free versions, omit cheese or use a dairy-free shredded alternative; a spoonful of nutritional yeast stirred in at the end adds savory depth. If you prefer less spice, choose diced tomatoes without chiles and reduce or omit the chili seasoning packet. Gluten-free pasta cooks differently — check package directions and shorten simmering time to avoid gummy texture.
Serving Suggestions
Serve this as a hearty main with simple sides: a crisp green salad with lime dressing, steamed corn, or warm cornbread. For contrast, top individual bowls with cool sour cream or Greek yogurt, sliced avocado, pickled jalapeños, or chopped cilantro. For a fun game-day spread, set out bowls of shredded cheese, scallions, and corn chips so guests can build their own bowls. It also pairs well with a crisp lager or an iced tea to cut through the richness.
Cultural Background
Chili Mac is a beloved American comfort staple that blends two classic dishes: chili and macaroni and cheese. It traces roots to simple home cooking where pantry staples were combined to feed families affordably. Regional variations reflect local preferences — some areas favor spicier chiles, others rely on beans or add beer for depth. Its popularity in cafeterias and potlucks stems from its crowd-pleasing nature and ease of scaling for large groups.
Seasonal Adaptations
In colder months, add winter vegetables such as diced bell pepper or shredded carrots during the onion step for extra heartiness. Summer versions can be brightened with fresh corn kernels and a squeeze of lime at the end. For holiday gatherings consider baking the finished mixture in a casserole dish topped with extra cheese and crushed tortilla chips for a crunchy crust, or mix in roasted hatch chiles for a smoky, seasonal kick.
Meal Prep Tips
To meal-prep, cook the full recipe, cool, and portion into single-serving containers. Keep cheese separate if you plan to reheat in the microwave to avoid separation; add shredded cheese just before serving so it melts fresh. If freezing, portion into flat, freezer-friendly pouches for quick thawing in warm water then reheat on the stove. Plan to add a splash of broth during reheating to refresh the sauce and restore a creamy texture.
Every time I make this, it sparks conversation and nostalgia — it’s the sort of dish that comforts and connects people. I hope you enjoy adapting it to your family’s tastes and making it a reliable weeknight favorite.
Pro Tips
Brown the beef well to develop flavor; those caramelized bits add depth to the sauce.
If the mixture becomes too thick while the pasta cooks, add warm broth 1/4 cup at a time until the desired consistency is reached.
Finish with cheese off the heat and cover for two minutes to melt it without causing oily separation.
Use low-sodium broth and canned goods if you want better control over the final salt level.
For the creamiest leftovers, reheat slowly on medium-low with a splash of broth and stir frequently.
This nourishing weeknight chili mac recipe is sure to be a staple in your kitchen. Enjoy every moist, high protein slice — it is perfect for breakfast or as a wholesome snack any time.
Tags
Weeknight Chili Mac
This Weeknight Chili Mac recipe makes perfectly juicy, tender, and flavorful steak every time! Serve with potatoes and a side salad for an unforgettable dinner in under 30 minutes.
Instructions
Heat and brown
Warm 1 tablespoon olive oil in a large skillet or Dutch oven over medium-high heat. Sauté minced garlic and diced onion until translucent, then add ground beef and brown thoroughly, about 6–8 minutes. Drain excess fat if desired.
Build the sauce
Stir in 2 cups beef broth, 2 cups pasta sauce, 10 ounces diced tomatoes with green chiles (undrained), 16 ounces chili beans (undrained), and the chili seasoning packet. Scrape browned bits from the pan and bring to a simmer.
Add pasta and simmer
Add 16 ounces elbow macaroni, bring mixture to a boil, then reduce heat to low and simmer uncovered or partially covered until pasta is tender, about 13–15 minutes. Stir occasionally and add small amounts of broth if needed.
Finish with cheese
Remove pan from heat, sprinkle 2 cups shredded Mexican cheese over the top, cover and let sit 2 minutes to melt. Stir gently before serving or serve with cheese unmixed for presentation.
Serve and garnish
Portion into bowls and offer sour cream, sliced avocado and corn chips as optional garnishes. Fresh herbs or scallions add brightness.
Last Step: Please leave a rating and comment letting us know how you liked this recipe! This helps our business to thrive and continue providing free, high-quality recipes for you.
Nutrition
Did You Make This?
Leave a comment & rating below or tag
@whiskia on social media!
Categories:
You might also like...

Savory Baked Meatballs
Tender, herb-laced meatballs baked to juicy perfection with Parmesan and garlic. Perfect over spaghetti, tucked into subs, or served with favorite dips.

Classic Bacon Carbonara Pasta
Creamy, silky carbonara with smoky bacon, peppery bite, and perfectly coated spaghetti. Ready in 25 minutes for a comforting, crowd-pleasing dinner.

One Pot Creamy Garlic Pasta
A rich, silky garlic pasta made in one pan with milk and Parmesan for a fast, comforting dinner that is ready in about 20 minutes.
Did You Make This?
Leave a comment & rating below or tag @whiskia on social media!
Rate This Recipe
Share This Recipe
Enjoyed this recipe? Share it with friends and family, and don't forget to leave a review!
Comments (1)
This recipe looks amazing! Can't wait to try it.
Comments are stored locally in your browser. Server comments are displayed alongside your local comments.

Hi, I'm Victoria!
What's Popular

30-Minute Meals!
Join to receive our email series which contains a round-up of some of our quick and easy family favorite recipes.